
Method 1: excel2latex, an Excel plugin
Download the excel2latex plugin from here. Once downloaded, double click on it and it will install itself as an Excel plugin.Once installed, you will be able to access it from the Add-ins tab in Excel:

Then you can select a table and click on the 'Convert Table to Latex' plugin to render the LaTeX format:
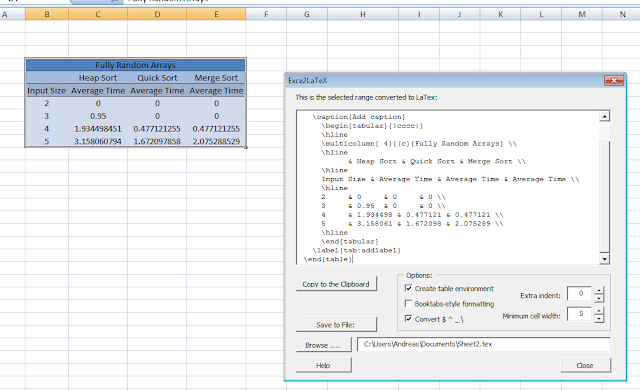
Note that if you enable the Booktabs-style formatting checkbox, you must include the following package in preamble of your LaTeX document:
\usepackage{booktabs}
This is the full code of the table it generated (without Booktabs-style formatting):
% Table generated by Excel2LaTeX from sheet 'Sheet2'
\begin{table}[htbp]
  \centering
  \caption{Add caption}
    \begin{tabular}{|cccc|}
    \hline
    \multicolumn{ 4}{|c}{Fully Random Arrays} \\
    \hline
          & Heap Sort & Quick Sort & Merge Sort \\
    \hline
    Input Size & Average Time & Average Time & Average Time \\
    \hline
    2     & 0     & 0     & 0 \\
    3     & 0.95  & 0     & 0 \\
    4     & 1.934498 & 0.477121 & 0.477121 \\
    5     & 3.158061 & 1.672098 & 2.075289 \\
    \hline
    \end{tabular}
  \label{tab:addlabel}
\end{table}
Note: I did encounter some very minor issues with the resultant LaTeX code from excel2latex, mainly when it came to rendering the outlines of certain tables.
For example, to render the table with the same borders it had in Excel, this line generated by the plugin:
multicolumn{ 4}{|c}{Fully Random Arrays} \\
must be changed to the following (notice the extra pipeline | in {|c|}):
multicolumn{ 4}{|c|}{Fully Random Arrays} \\
Method 2: Using GNOME's Project, Gnumeric
Gnumeric is another Spreadsheet application, but unlike Microsoft Excel, it supports the functionality of exporting spreadsheets to .tex format.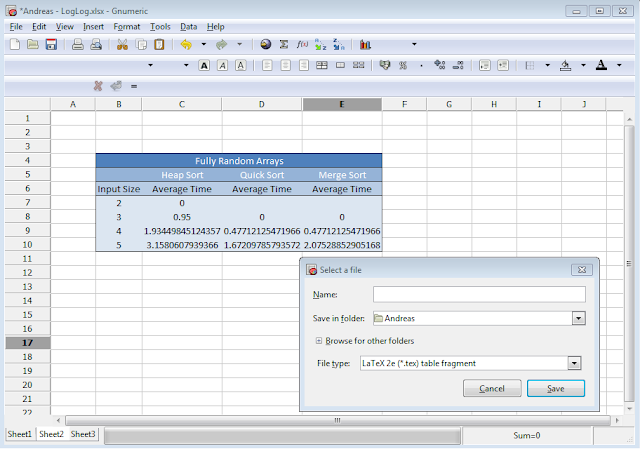
Gnumeric offers two possibilities. You can either save the spreadsheet as a table fragment, ie generating the following:
%%%%%%%%%%%%%%%%%%%%%%%%%%%%%%%%%%%%%%%%%%%%%%%%%%%%%%%%%%%%%%%%%%%%%%
%%                                                                  %%
%%  This is a LaTeX2e table fragment exported from Gnumeric.        %%
%%                                                                  %%
%%%%%%%%%%%%%%%%%%%%%%%%%%%%%%%%%%%%%%%%%%%%%%%%%%%%%%%%%%%%%%%%%%%%%%
Fully Random Arrays & & &\\
 &Heap Sort &Quick Sort &Merge Sort\\
Input Size &Average Time &Average Time &Average Time\\
2 &0 & &\\
3 &0.95 &0 &0\\
4 &1.93449845124357 &0.47712125471966 &0.47712125471966\\
5 &3.1580607939366 &1.67209785793572 &2.07528852905168\\
Or you can save the whole spreadsheet as a complete LaTeX document, in which case it is probably an overkill for our current scenario of just rendering a single table.


