Wednesday, December 19, 2012

Auto-Generating EventArgs classes with T4

T4 is a code generator built into Visual Studio. In this post, I will present a T4 template file which I've used to help auto-generate Event Arguments classes in C#.

Normally, event arguments classes always follow the same structure. You typically have a set of public properties in a class which extends EventArgs and a constructor which takes in the same number of formal arguments.

Here's a typical event arguments class:

public class OperationCompletedEventArgs : EventArgs
{
    public bool Result { get; private set; }

    public OperationCompletedEventArgs(bool result)
    {
        Result = result;
    }
}

Given the repetitive nature of how typical event arguments classes are structured, they make a perfect fit for an example of code generation.


The intent of my template file for generating event arguments classes is to be able to define a declaration of what classes I want to be generated and then let the template generate those classes for me.

The declaration part of the template looks something like this:

var collection = new List<EventArgumentsRepresentation>
                 {
                     new EventArgumentsRepresentation("OperationCompleted")
                     {
                         Members = new Dictionary<string, string> { 
                             {"Result", "bool"}
                         }
                     },
                     new EventArgumentsRepresentation("GenericAndPartial")
                         {
                             AccessModifier = "internal",
                             IsPartial = true,
                             GenericTypes = new List<string>() { "T", "TK"},
                             Members = new Dictionary<string, string> { 
                                 {"GenericMember1", "T"},
                                 {"GenericMember2", "TK"}
                             }
                         }
                 };


Given the above structure, the template would then generate the following two classes for me:

public class OperationCompletedEventArgs : EventArgs
{
    public bool Result { get; private set; }

    public OperationCompletedEventArgs(bool result) 
    {
        Result = result;
    }
}

internal partial class GenericAndPartialEventArgs<T, TK> : EventArgs
{
    public T GenericMember1 { get; private set; }
    public TK GenericMember2 { get; private set; }

    public GenericAndPartialEventArgs(T genericMember1, TK genericMember2) 
    {
        GenericMember1 = genericMember1;
        GenericMember2 = genericMember2;
    }
}

The next I would want a new event arguments class, I would just add a new instance of EventArgumentsRepresentation to the list and let the template do the work.


And now, for the entire template file. If you want to use it for your own projects, create a new "Text Template" (.tt file) in Visual Studio and copy the below template into it. Once you then save the template file, the classes will be generated into a .cs file.

<#@ template debug="false" hostspecific="false" language="C#" #>
<#@ assembly name="System.Core" #>
<#@ import namespace="System.Linq" #>
<#@ import namespace="System.Collections.Generic" #>
<#@ output extension=".cs" #>

<#
var namespaceName = "EventArgumentsGenerationDemo";
var usings = new List<string> {
    "System",
};

var collection = new List<EventArgumentsRepresentation>
                 {
                     new EventArgumentsRepresentation("OperationCompleted")
                     {
                         Members = new Dictionary<string, string> { 
                             {"Result", "bool"},
                         },
                     },
                     new EventArgumentsRepresentation("GenericAndPartial")
                         {
                             AccessModifier = "internal",
                             IsPartial = true,
                             GenericTypes = new List<string>() { "T", "TK"},
                             Members = new Dictionary<string, string> { 
                                 {"GenericMember1", "T"},
                                 {"GenericMember2", "TK"},
                             },
                         },
                     
                 };
#>
namespace <#=namespaceName#>
{
<#
foreach (var usingDirective in usings) {
#>
    using <#=usingDirective#>;
<#
}
#>

    /*
     * This file is autogenerated.  
     *
     * If you want to edit anything from here, use the EventArgumentsClasses.tt file.
     */

<#
foreach (var eventArgsRepresentation in collection) {
#>
    <#=eventArgsRepresentation.ClassSignature#>
    {
<#
foreach (var member in eventArgsRepresentation.Members) {
#>
        public <#=member.Value#> <#=EventArgumentsRepresentation.ToPascalCase(member.Key)#> { get; private set; }
<#
}
#>

        public <#=eventArgsRepresentation.ClassName#>(<#=eventArgsRepresentation.GetConstructorArguments()#>) 
        {
<#
foreach (var member in eventArgsRepresentation.Members) {
#>
            <#=EventArgumentsRepresentation.ToPascalCase(member.Key)#> = <#=EventArgumentsRepresentation.ToCamelCase(member.Key)#>;
<#
}
#>
        }
    }

<#
}
#>
}

<#+
internal class EventArgumentsRepresentation
{
    public string ClassName { get; private set; }

    public string AccessModifier { get; set; }
    public bool IsPartial { get; set; }
    public List<string> GenericTypes {get; set;}
    public Dictionary<string, string> Members { get; set; }
    public string ClassSignature {
        get {
            return String.Format("{0} {1}class {2}{3} : EventArgs", AccessModifier, IsPartial ? "partial " : "", ClassName, GetGenericTypesSignature());
        }
    }

    public EventArgumentsRepresentation(string name)
    {
        ClassName = String.Format("{0}EventArgs", ToPascalCase(name));
        AccessModifier = "public";
        GenericTypes = new List<string>();
        Members = new Dictionary<string, string>();
    }

    public string GetGenericTypesSignature() {
        if (GenericTypes.Count < 1) {
            return "";
        }

        return String.Format("<{0}>", string.Join(", ", GenericTypes.ToArray()));
    }

    public string GetConstructorArguments() {
        if (Members == null || Members.Count < 1) {
            return "";
        }

        return String.Join(", ", Members.Select(k => String.Format("{0} {1}", k.Value, ToCamelCase(k.Key))).ToArray());
    }

    public static string ToPascalCase(string text) {
        return char.ToUpper(text[0]) + text.Substring(1);
    }

    public static string ToCamelCase(string text) {
        return char.ToLower(text[0]) + text.Substring(1);
    }
}
#>

Thursday, November 1, 2012

F5 not building before running in Visual Studio 2012

I recently started using Visual Studio 2012 but got quite annoyed after I realized that the F5 shortcut was not building the projects in my solution before actually running them. Because of this, I was ending up with inconsistencies between the running application the source code.

Long story short, here's how to fix this.

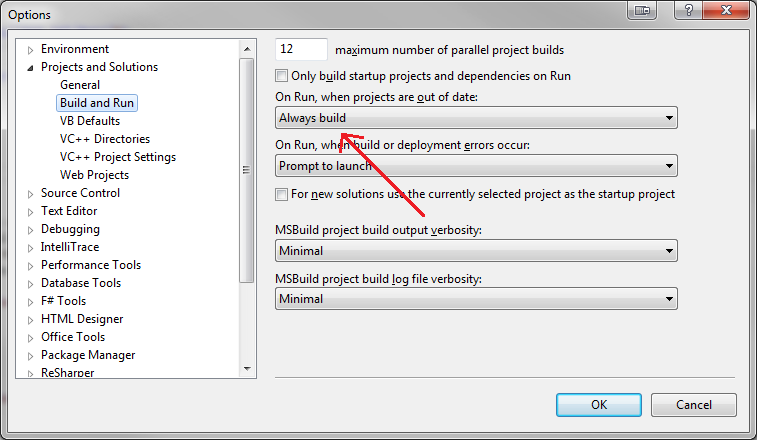
Open the Options box from Debug > Options and Settings, then from Projects and Solutions > Build and Run, make sure that the dropdown for On Run, when projects are out of date:, the "Always build" value is set:

Thursday, October 25, 2012

Fixing "Not a debug ModuleBuilder." thrown by SetLocalSymInfo

This was the first problem I had when I started playing with CIL and emitting CIL code with C#'s Emit; an InvalidOperationException: Not a debug ModuleBuilder:


The reason this was happening was because of this line:

ModuleBuilder mb = ab.DefineDynamicModule(an.Name, "MainModule");

The DefineDynamicModule has an overload which lets you specify whether symbol information should be emitted, and by default it's false.

By setting this emitSymbolInfo argument to true, it will also emit the pdb file for your assembly.

So I passed in the argument and my problem was solved:
ModuleBuilder mb = ab.DefineDynamicModule(an.Name, "MainModule", true);

Monday, October 15, 2012

Taking a screenshot of an application in C#

Recently I needed a way to take screenshots of applications programmatically in C# and I wrote this small application to accomplish that task for me.

You can find the source here: https://github.com/dreasgrech/Screenshotter.

The only requirement I had was that I supply the pId (process ID) and the application takes a screenshot of that process for me...but the application can be very easily extended to accept a process name or anything that can identify a process.


Sunday, October 14, 2012

Cracking .NET applications - a simple tutorial

For this tutorial, I will be making use of Reflector and a plugin for Reflector called Reflexil, and also Gray.Wolf to partially view unobfuscated C# code.

Patching the CIL with Reflexil

Here is a very trivial example of how a simple application can validate a license key:
static void Main(string[] args)
{
    var invalidKey = "48011147";

    if (LicenseManager.Verify(invalidKey))
    {
        Console.WriteLine("Thank you for buying our product!");
    } 
    else
    {
        Console.WriteLine("Invalid license key; continue evaluation.");
    }
}
static class LicenseManager
{
    private static string validKey = "112358";

    public static bool Verify(string key)
    {
        return key == validKey;
    }
}
From the code, it's fairly easy to see that to bypass the license key validation logic in our application, we simply need to modify the LicenseManager.Verify method to just return true rather than check for the valid license key.

Running the unmodified application yields the following, since the equality check obviously fails:


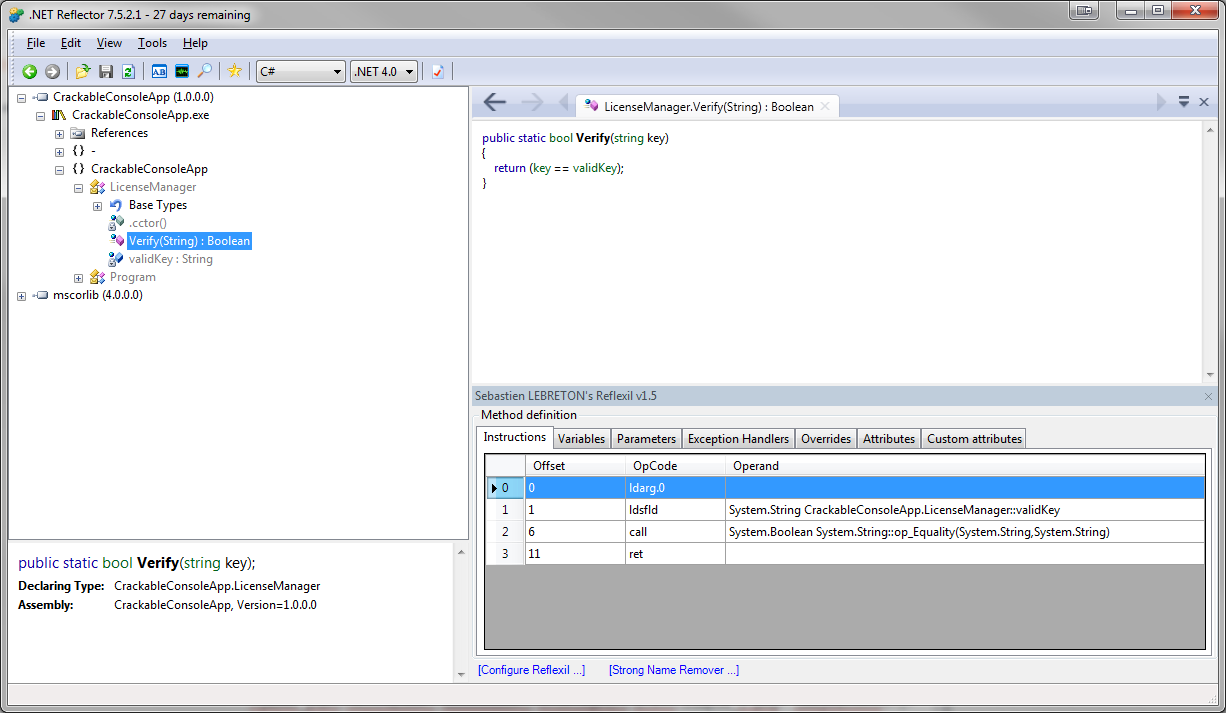
So now let's start patching the application by first doing some reconnaissance. Fire up Reflector, add our compiled exe file and navigate to the LicenseManager.Verify method:


Now there are couple of ways we can modify the code with Reflexil...but let's start with the harder way, by modifying the CIL code directly.

If you look at the current CIL, we see that we have four operations: ldarg.0, ldsfld, call and ret:


Here's what's going on:
  1. ldarg.0 loads and pushes the actual argument at position 0 (string key) to the stack.
  2. ldsfld loads and pushes the value of the static field validKey ("112358") to the stack.
  3. call invokes the System.String::op_Equality(string, string) method by popping the last two values from the stack, comparing them and then popping the returned boolean value on the stack.
  4. ret pops and returns the value that the op_Equality last pushed on the stack.

Now that we know what's going on, we need to change these instructions to simply return true rather than comparing the strings.

This means that our code should instead do:
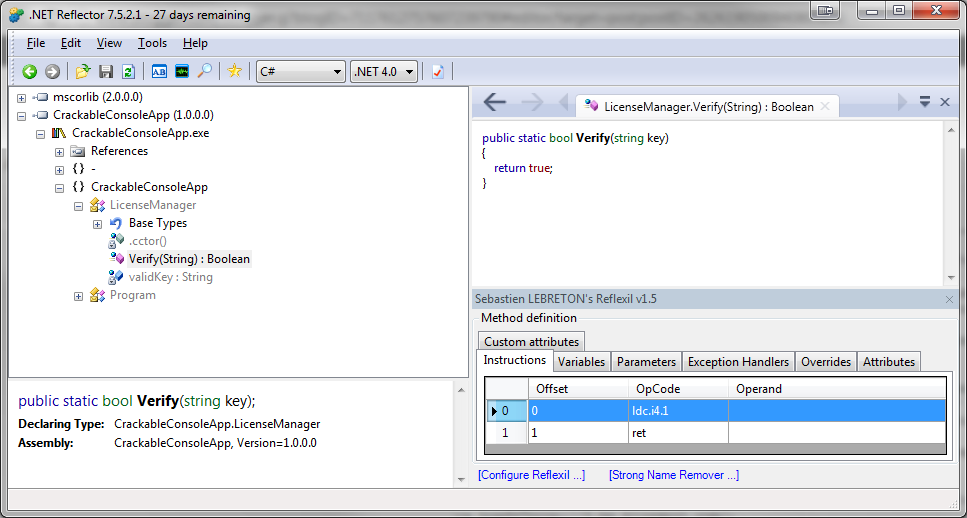
  1. ldc.i4.1 to push the constant value of 1 onto the stack.
  2. ret to pop and return that value.

Note that if we didn't know how to actually write a method which just returns true in CIL, we could have simply wrote the method in C#, compiled it and then view it's corresponding CIL with Reflector:


As for why you see a .maxstack in the above examples, you can find a pretty good explanation here. It seems that this is used by analysis tools.

Using Reflexil, we can now remove the existing operations and replace them with our desired code:


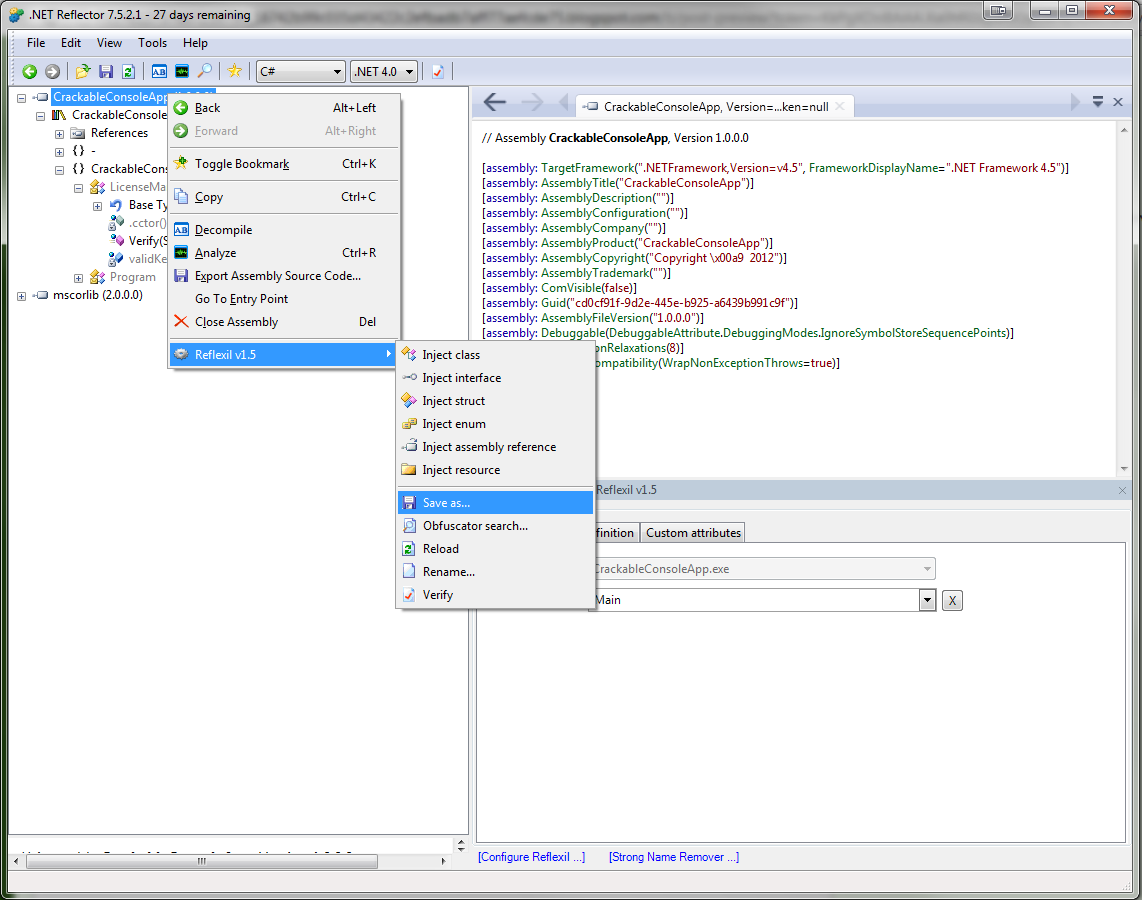
Once that's done, we should now save our modified executable:


Running our newly patched compilation now shows:


Which is exactly what we strived for, since the validation logic has now been eliminated!

Opening our patched application in Reflector, we can now see the new code:


Patching by modifying the C# code directly

Using Reflexil, there's an even easier way of patching our code...by actually writing C# code rather than CIL!

Using a modified version of our first application from the previous example, we will now patch the code by writing C# code.

This is our new, slightly more "complex" licensing code:
static void Main(string[] args)
{
    var invalidKey = "48011147";

    if (LicenseManager.Verify(invalidKey) )
    {
        Console.WriteLine("Purchased license: {0}", LicenseManager.LicenseType);
    } 
    else
    {
        Console.WriteLine("Invalid license key; continue evaluation.");
    }
}
static class LicenseManager
{
    private static string validKey = "112358";
    public static string LicenseType { get; set; }

    public static bool Verify(string key)
    {
        if (key == validKey)
        {
            LicenseType = "Enterprise";
            return true;
        }

        return false;
    }
}

Notice how now, for the validation process to properly succeed, we need to set the LicenseKey property to "Enterprise" before returning true from the method.

Now of course, we can do this in CIL again, but this time we'll use a much easier method.

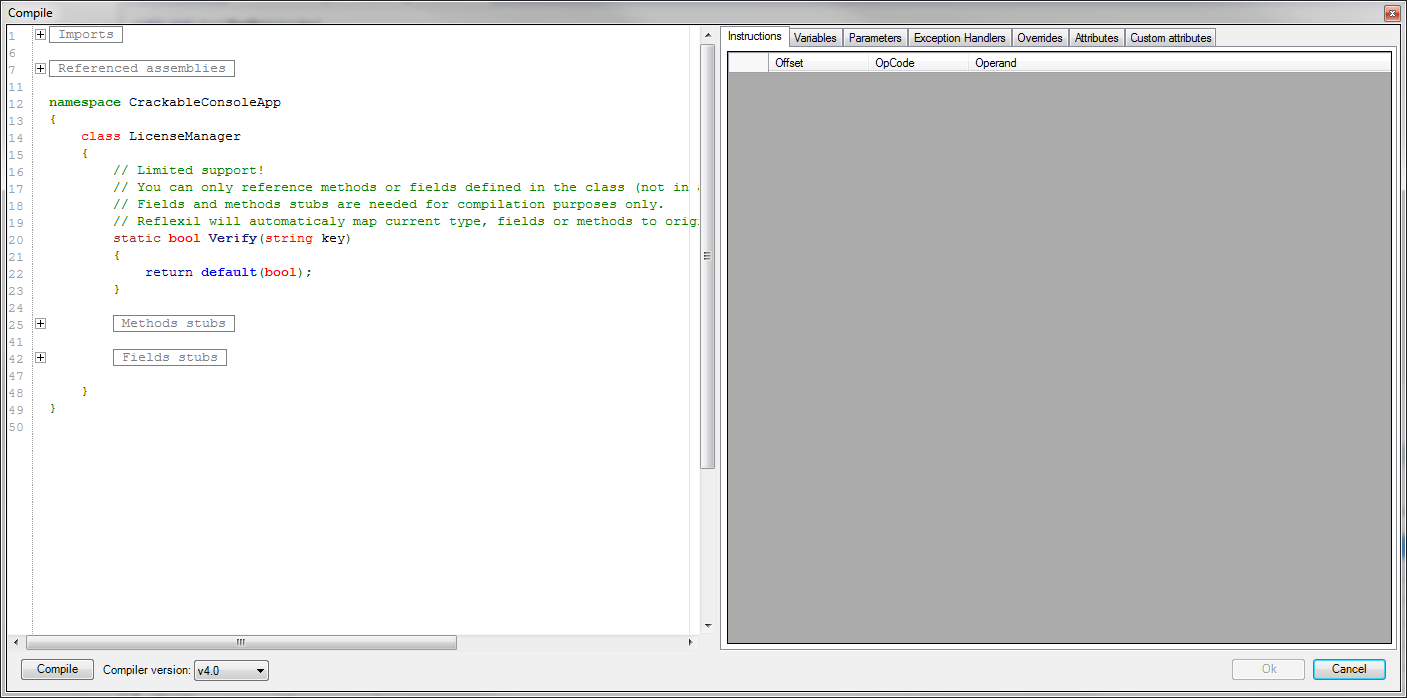
Open up the application with Reflector, but this time, instead of changing the CIL opcodes directly, right click the Reflexil window and choose "Replace all with code...":


This will bring up this window:


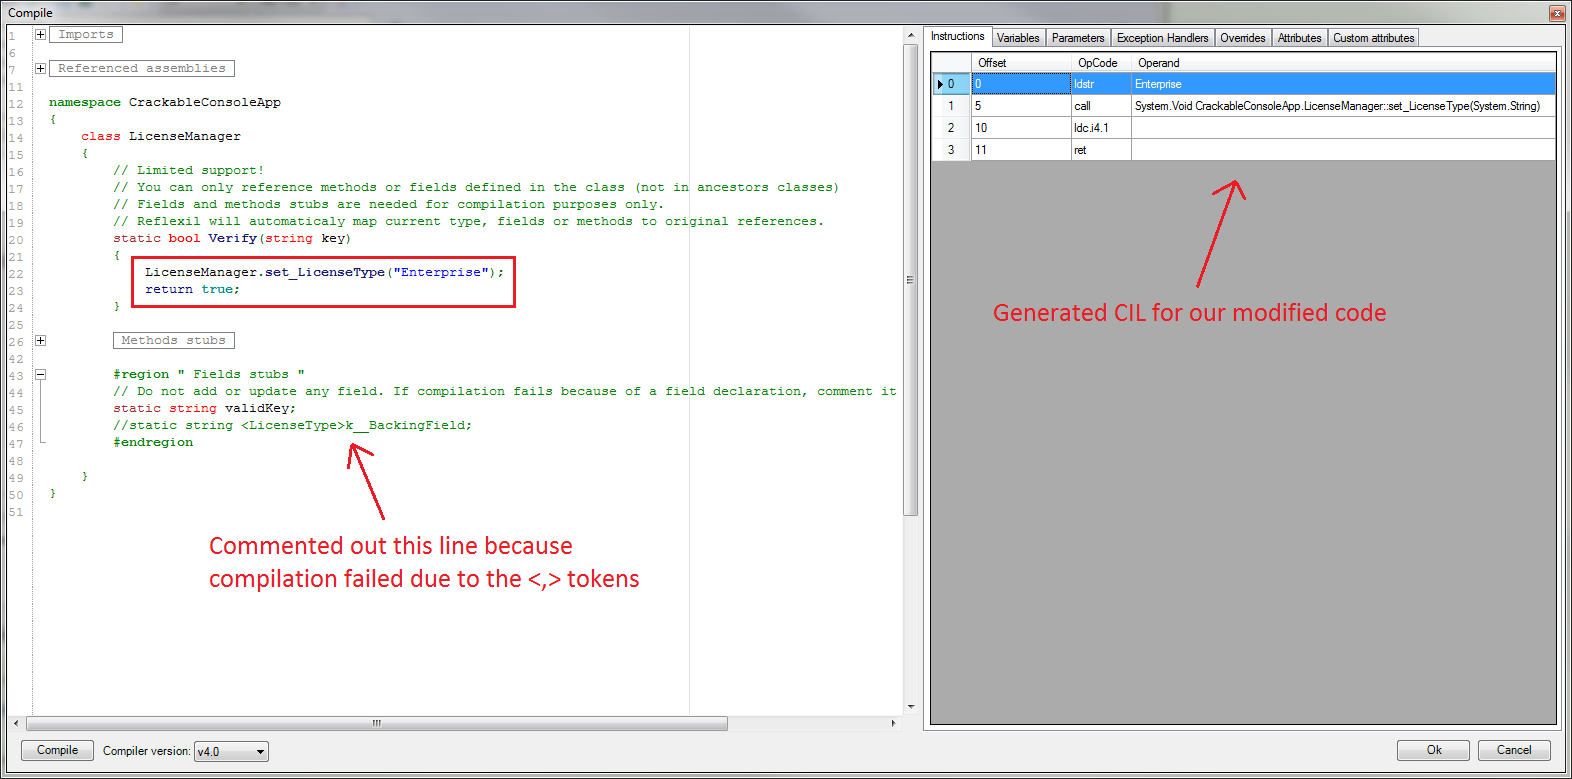
From here, we now need to type in the code that will set the LicenseType property to "Enterprise" and then return true from the method. After you input the code and press the Compile button, you should end up with the following:


Looking at the generated CIL code, we see the opcodes from before:
  1. ldstr to load the "Enterprise" string onto the stack.
  2. call which invokes the set_LicenseType method (Properties in C# are just syntactic sugar for fields and their backing get/set methods) by popping the "Enterprise" string and using it as an actual argument.
  3. ldc.i4.1 to push the integer 1 on the stack.
  4. ret for popping and returning our boolean.

Saving and running our patched application, we now get:


What if the assembly is obfuscated!?

Sometimes, when you try to open a .NET assembly with Reflector, you will be slapped in the face with this message:


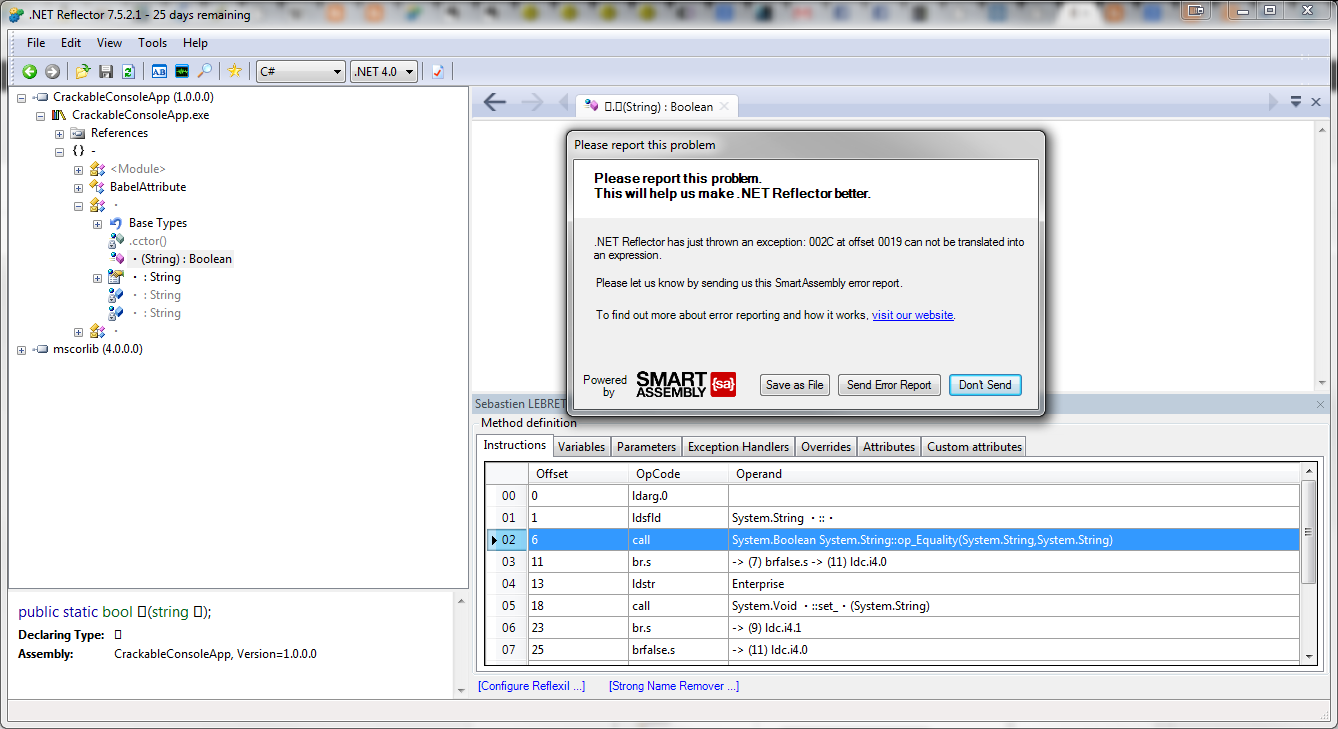
Or, even worse, when I obfuscated the last example program we wrote with a trial version of babelfor.NET, Reflector crashed when I tried to open our LicenseManager.Verify method:


Note though that Reflexil still shows us the CIL code, so we don't have any problems when we need to work with CIL code directly...although it will be a bit harder to understand the code by looking at the CIL code only.

And also, if you change the language in Reflector to IL, you will prevent it from crashing but of course you still won't be able to view the raw C# code:


But what we want to do for now is to find a way to view unobfuscated C# code, and that's where an application such as Gray.Wolf comes to the rescue!

Opening our application in Gray.Wolf and navigating to the Verify method, we get:


As you can see from the right pane, it couldn't completely deobfuscate all of our code for this example but it's at least giving us a very good hint as to what's going on without studying the CIL code.

From the C# code, we can see that there is an if-statement and although Gray.Wolf couldn't deobfuscate the two operands used in the statement, we can make out what they are from the CIL code because the two values that are pushed on the stack before the op_Equality is called are done using ldarg.0 which loads the first only actual argument in the method and ldsfld which loads a value from a static field and since the only possible static that we have which makes sense to compare to is validKey, we can be pretty certain that it's using that value.

Sunday, September 23, 2012

Immediately-invoking functions with an exclamation point in JavaScript

Recently I had to make use of Twitter buttons and I noticed something particularly interesting in their bootstrap code:
!function(d,s,id){var ... }(document,"script","twitter-wjs");

What's interesting to note here is this incantation:
!function () {

}();

Notice how this looks awfully familiar to how one would normally express an immediately-invoked function:
(function () {

}());

In fact, they are fundamentally doing the same thing, yet the former is a byte shorter.


Note that this technique can be accomplished with the other unary operators as well:
-function(){}();
~function(){}();
+function(){}();

What's happening here is that the unary operators are turning a function declaration [function () {}] to a function expression [!function () {}], which can then be immediately-invoked.

One limitation to using this method is that you can't get back the output of the function, unless you are expecting a truthy/falsy value.

This is because the return value is coerced to a boolean when using the exclamation point and negated (since the function invocation has higher precedence, which is why this technique works), and you can't undo that boolean coercion operation on complex types, strings and numbers.

You can however undo the negation operation if you are expecting a truthy/falsy value by simply double negating the output: var truthy = !!function () { return 1; }();


Webroulette: Take me somewhere random!

So once again, what follows is the result of a weekend-project-during-the-week kind of thing.

Similar to chatroulette.com where you shuffle through random people, I wrote this so that you can shuffle through random websites instead:


You can also specify a single word to be used as a form of bias:


You can see it in action here: http://dreasgrech.com/upload/webroulette/.

Source code

As usual, the source for this project resides on github.

How it's done

In a nutshell, I basically do a Google Custom Search API call with a randomly constructed query and then show the first result from the collection of hits.

The server
On the server, I have a file of ~8.5k commonly used English words, and based on the length query string value, I select a number of these words in a random manner.

Note that I enforce a hard limit on the range for the allowed values of length; currently, the range is [0, 10]. If no length is specified, I default it to 3.

This is the word-list that I'm currently using is at http://dreasgrech.com/upload/webroulette/komuni.txt

If a bias is specified, I use it as the first word in the phrase and once this phrase is built, it's echoed so that it can be read by the client.

Here are some examples of the script in action:

http://dreasgrech.com/upload/webroulette/louie.php
http://dreasgrech.com/upload/webroulette/louie.php?bias=obfuscation
http://dreasgrech.com/upload/webroulette/louie.php?bias=douglasadams&length=6

The client
So what the client does is an Ajax call to this PHP script to get the query and then do an Ajax call to the Google Custom Search API to get a list of hits. Btw, I'm also using a query string which I termed iesux which I use for a unix timestamp, and I had to do this because calls to the same url were being cached by Internet Explorer and so I needed this timestamp to introduce variety to the urls.

What I then show on screen is the first result from the list of google hits from that query.

Why not embed an I'm Feeling Lucky link in the iframe?
Halfway during the project, I realized that this functionality is pretty similar to the I'm Feeling Lucky functionality that Google still offers (for some reason?).

I figured that this way, I would eliminate the need to use the API (which, btw, has a 100 queries a day limit) but instead use an I'm Feeling Lucky url (like http://www.google.com/search?&btnI=745&q=obfuscation) for the source of the iframe.

But after I tried a couple of queries like this, I realized that sometimes, an I'm Feeling Lucky url redirects to an actual Google Search page and since Google prevents their site to be rendered in an <iframe>, I was getting a lot of blank pages in the <iframe>...and that sucks.

What about the 100 query limit?
For the free offering of the Google Custom Search API, Google enforces a 100 queries per day (per project) limit.

To work around this, I created five projects (i.e. 5 API keys) and whenever someone loads the page, I serve one of the five keys at random. If it turns out that that particular key is used up, the client requests another API key.

You can also specify your own API key (make sure your that the the Custom Search API service is turned on) using the key query string, as follows:

http://dreasgrech.com/upload/webroulette/?key=AIzaSyCCv2V9wF1cO1uck19H5uuAodJ-Ml0rBgg

Monday, March 5, 2012

A run-length encoder in JavaScript

Run-length encoding is one of the most trivial forms of data compression methods. It works by combining runs of characters into a value containing the number of times that character is repeated in the run and the actual character itself.

So something like:
UUUXXXXXXXXXXXXXXXXXXXXTTTTTKKKKK
would be encoded to:
3U20X5T5K
In this case, the encoded version of the text has been reduced by ~73%. But note that there may be cases where the encoded text would end up larger than the actual (decoded) plain text; this happens when the text contains many isolated characters rather than runs of characters.

Take for example abcdefghijklmnopqrstuvwxyz (26 characters); if you 'compress' that using a run-length algorithm, you'll end up with 1a1b1c1d1e1f1g1h1i1j1k1l1m1n1o1p1q1r1s1t1u1v1w1x1y1z (52 characters) which is a 100% increase from the decoded version.

Source and demo

The source can be found at https://github.com/dreasgrech/runlength-js

And the demo of the encoder is at http://dreasgrech.com/upload/runlength/

Note that as of current, the code does not handle instances where the decoded text contains digits.


Wednesday, February 1, 2012

Creating POJOs in JavaScript

POJO stands for Plain Old Java Object, but in our case, it will be JavaScript instead of Java...Plain Old JavaScript Objects.

Sometimes in your code, you would need to create objects that are just containers for members (in OOP terms, these objects are usually referred to as classes).

As an example:
var dog = function (name, age) {
 return {
       name: name,
       age: age
 };
};
Now you can obviously write all this by hand, but you don't have to because you can write a function that makes use of JavaScript's dynamic nature to do it for you:
var pojo = function () {
    var members = arguments;

    return function () {
        var obj = {}, i = 0, j = members.length;
        for (; i < j; ++i) {
            obj[members[i]] = arguments[i];
        }

        return obj;
    };
};
And this is how it can be used:
var dog = pojo('name', 'age'), // create the POJO
    fido = dog('Fido', 2); // create an 'instance' of the POJO

// fido.name -> 'Fido'
// fido.age  -> 2

The pojo function is pretty straightforward. First we grab a reference to the arguments object (which contains the names of the members that we want to be in our object; ['name', 'age']) and then return a function which will serve as the initializer for our POJO object.

Once the inner initializer function is invoked from the outside (dog('Fido', 2)), we iterate through the member names we got from the initial arguments object to create a new object (obj) containing the member names and the values of the actual arguments that were passed to the inner function as their respective values.

If you only want a single 'instance' of the POJO, you can get away with a one-liner:
var fido = pojo('name', 'age')('Fido', 2);

Thursday, January 26, 2012

Bulk converting from YouTube-MP3.org

[Update]

Following an email conversation I had with Philip Matesanz, the owner of Youtube-MP3, I've decided to take down my github repository because of worries that my tool could be used to flood their server with requests.


YouTube-MP3.org is a free service which lets you convert YouTube videos to MP3s.


It's a great service, but you if you have many YouTube videos you want to convert, it can be a bit tedious to do them one by one while waiting for each one to complete and then download manually; and that's what I aimed to fix.

Bulk downloading

I wrote this application which takes a text file that is filled with YouTube links as input and which then starts relaying those links to the YouTube-MP3 service for conversion and downloading.

The text file needs to be structured as follows i.e. a YouTube link on each line:

http://www.youtube.com/watch?v=eslhuSEC_QU
http://www.youtube.com/watch?v=A7x_z6tG4yY
http://www.youtube.com/watch?v=MLxPknwiNoc
http://www.youtube.com/watch?v=WYV7qYyHKIs
http://www.youtube.com/watch?v=4f1K4HNnQWo
http://www.youtube.com/watch?v=SEsKwOrejec
http://www.youtube.com/watch?v=f4CwlUSSTzk
http://www.youtube.com/watch?v=G6ZsvYA-YTo
http://www.youtube.com/watch?v=tK7b3Y42w3k
http://www.youtube.com/watch?v=0ppTcHjvtsU
http://www.youtube.com/watch?v=8ZjADBfqOR4
http://www.youtube.com/watch?v=DW3ZpytL2Nk
http://www.youtube.com/watch?v=CsdzJTW7SUk

The process converting/downloading works in iterations. Those videos which fail to convert/download during one iteration are moved to the next iteration so that the conversion/download can be tried again. This is because YouTube-MP3 restricts its API usage to 10 conversion/downloads per hour. Between each iteration, there is an interval during which the program is halted to wait until the iteration starts.

The make the application more efficient, it converts/downloads videos simultaneously, rather than sequentially. This means that the total running time of the program is equivalent to the longest-running job's time, not to the sum of all the job's times.

Usage

Usage: BulkYoutubeMP3Console.exe [options] <Youtube links file>

Options:
  -p, --path=VALUE           The download path
  -t, --time=VALUE           The waiting time in minutes between the
                               iterations.  Minimum: 10 minutes
  -x, --proxy=VALUE          Use if you want to use a proxy for downloading.
                               Format => : (default 80)


You can find the source of app from https://github.com/dreasgrech/bulk-youtube-mp3

The following is an example run:


Promoting your Chrome extension with a yellow infobar

This is a jQuery plugin I wrote which emulates Chrome's infobar for promoting a Google Chrome extension.

The following are Chrome's infobar and the one I wrote for the plugin, respectively:

Demo

I've set up a small demo of the plugin here: http://www.dreasgrech.com/upload/extinfobar/.

Download

Until the jQuery plugins page is restored, you're gonna have to download this plugin directly from github.

The plugin can be found at the jQuery plugins site: http://plugins.jquery.com/extinfobar/

You can get the full source of the plugin from https://github.com/dreasgrech/ChromeExtInfoBar

These are all the images that you need:


Usage

The simplest way to use the plugin is to simply invoke it using just your Chrome extension ID:
$.fn.extInfobar({
    id: 'nbilgjjflfiiijecdjpnbganoiafneph'
});

You can also specify a custom message to be displayed on the infobar, as opposed to the default message:
$.fn.extInfobar({
    id: 'nbilgjjflfiiijecdjpnbganoiafneph',
    message: 'This is my custom message I want to show on the infobar'
});

There are three other optional parameters you can pass; redirectIfInstallFails, rememberClose and rememberRedirect. All three default to true if unspecified.
$.fn.extInfobar({
    id: 'nbilgjjflfiiijecdjpnbganoiafneph',
    message: 'This is my custom message I want to show on the infobar',
    redirectIfInstallFails: false,
    rememberClose: false,
    rememberRedirect: false
});

redirectIfInstallFails specifies whether the plugin should redirect the user to the extension's Chrome Webstore page if the installation happens to fail or if the site you're using the plugin on is not verified (more info on that below).

When the user clicks on the close button, the action is remembered via localStorage so that the bar is not displayed again for him but the rememberClose parameter allows you to override this functionality; so if you set it to false, the bar will keep appearing on subsequent page visits even if the user closed it.

The last parameter, rememberRedirect, is used to save the action of the plugin redirecting the user to the extension's Chrome Webstore; by default, the action is saved which means that once a user is redirected to the Chrome Webstore page, the bar will not be shown to him on subsequent visits to your page, but you can of course override this functionality by setting rememberRedirect to false.

How it works

The plugin makes use of Chrome's inline installation functionality, but note that this only works if your extension's website is verified and this plugin is invoked from the same domain as the verified site.

When you click on the 'Install' button on the infobar, and the context meets the two aforementioned criteria, the following modal dialog will pop up:


Otherwise, the user will be redirected directly to the extension's page on the Chrome Webstore (unless the redirectIfInstallFails option is explicitly set to false).


Making Facebook's Graph API work in Internet Explorer

I've encountered several issues while trying to get Facebook's Graph API work in IE.

As for my general setup, I was using jQuery's getJSON and a typical call looked something like the following:

$.getJSON('https://graph.facebook.com/13601226661?access_token=' + accessToken, function (response) {
    callback(response);
});

The first problem was that I was getting a No Transport when making a call to https://graph.facebook.com. The issue here was due to the fact that IE uses XDomainRequest and I ultimately resolved it by using the following workaround: https://github.com/jaubourg/ajaxHooks/blob/master/src/ajax/xdr.js.

This is because XDomainRequest is currently not supported in jQuery.


After including the xdr.js file, I started getting a different problem. Internet Explorer now started saying "Access is denied" whenever I make the AJAX call.

After some reading, I found out from here that:

7) Requests must be targeted to the same scheme as the hosting page.

Essentially this means that "[...] if your AJAX page is at http://example.com, then your target URL must also begin with HTTP. Similarly, if your AJAX page is at https://example.com, then your target URL must also begin with HTTPS".

And of course, I was making calls from http (my domain) to https (graphs.facebook), and that goes against the aforementioned point #7.

So what I first tried was to make a call to http://graphs.facebook.com instead (i.e. using http instead of https), and that works...but only when not using an access_token in your request; and I needed to include my token in all the requests.

And the solution to this problem was jsonp. With jsonp, IE allows the cross-domain requests. I'm not going to go into the details of jsonp in this post, and luckily, jQuery supports it natively since all you need to do is include callback=? as part of your request. This means that my calls now changed as follows:

$.getJSON('https://graph.facebook.com/13601226661?access_token=' + accessToken + '&callback=?', function (response) {
    callback(response);
});

Monday, January 9, 2012

Paste and Go - A Google Chrome extension

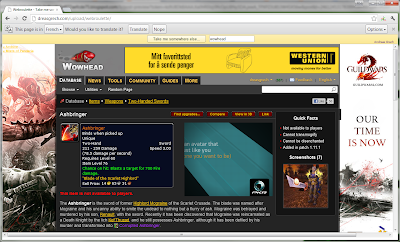
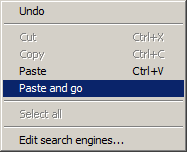
A functionality in browsers, specifically Google Chrome and Mozilla Firefox, which I find extremely comfortable is "Paste and Go".


This pastes in your clipboard contents in the address bar and submits it automatically at one go, which is a step less than pressing Paste and then submitting manually.

Because I like this functionality a lot, I decided to try and emulate it for input textboxes on websites with a Google Chrome extension.


Download

The extension is published at https://chrome.google.com/webstore/detail/nbilgjjflfiiijecdjpnbganoiafneph

And the source: https://github.com/dreasgrech/PasteAndGo

How it works

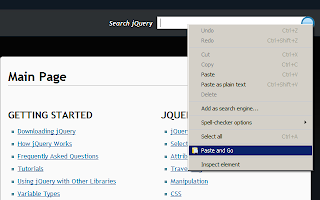
When invoking it (Right Click -> Paste and Go), the extension grabs reference to the input text box where you right clicked, clears its value and pastes in the contents of your clipboard.

It then searches for the closest <form> to your text box with jQuery's closest function and if it finds a form, it submits it.

Note that closest only traverses up the DOM tree, so it will not find <form>s which are either below (in the tree) or adjacent (siblings) to your input text box.

If no <form> is found, another approach is taken. This time, the extension searches for the closest button to your input text box and if it finds one, it clicks it. This time though, I couldn't use jQuery's closest since, most of the time, submit buttons in <form>s are placed after the input text box. Therefore, I wrote this function to find the 'closest' button:

var getClosestButton = function (el) {
        var buttons;
        while ((el = el.parent()).length) {
            buttons = el.find(":button, input[type=submit]"); // :button -> "input[type=button], button"

            if (buttons.length) {
                return buttons.eq(buttons.length - 1);
            }
        }
};

Once a button is found, a click event is simulated on it.

A word of caution

This extension may not always work as expected. This is because it assumes that the first <form> it finds closest (upwards only) to your input box is the correct form which needs to be submitted, or that the 'closest' button that's found near your input box is the button that needs to be clicked...and the extension may not always find the correct button or submit the correct form; although the later is very rarely an issue.

Therefore, use it at your own risk.

Here are some of the places where it worked successfully:
  • Facebook
  • docs.jquery.com
  • Stackoverflow
  • Twitter
  • Google
  • Yahoo!
  • Bing
  • YouTube
  • The Pirate Bay

And here are some of the sites in which it didn't work as expected:
  • Grooveshark
  • Gmail
  • CodePlex

Where did you try it, and did it work as expected?