Friday, December 20, 2013

Embedding sprites in a dfLabel with DFGUI

One of DFGUI's cool features is the ability to inline-embed images in a dfLabel to avoid having separate sprites layered on top of the dfLabel.


To embed sprites in a dfLabel, you must first make sure that the Process Markup checkbox (Label Properties->Formatting) is ticked.

Then, embedding sprites is done using the sprite tag: Press [sprite "xbox_a"] to Select

The sprite that is specified in the sprite tag (in my case it's "xbox_a") is fetched from the Atlas that is specified on the dfLabel.

Friday, December 13, 2013

A 2D Freeform Directional Blend Tree for locomotion in Unity 3D

This video demonstrates a root-motion driven, 2D Freeform Directional Blend Tree for locomotive states in Unity 3D.

Using such a blend tree, a character can aim and walk in different directions independently and simultaneously.


With a gamepad, I'm moving the character with the left stick and rotating with the right stick.

I am using a total of 9 animations for the blend tree. Four for each axis and the middle one for idle:
  1. Idle
  2. Forward Walk
  3. Backward Walk
  4. Left Strafe Walk
  5. Right Strafe Walk
  6. Forward Run
  7. Backward Run
  8. Left Strafe Run
  9. Right Strafe Run

Here's a closer look at the blend tree and its motions:


This locomotive blend tree exists on an Animator Layer called LowerBody which has has an Avatar Mask applied with only the legs selected (including IK). By having layers representing different sections of the body, I can combine upper-body animations with lower-body animations. In my case, the character can walk/run and aim at the same time using a single animation for AIMING (which exists on the upper-body layer).

This is the Avatar Mask I use on the Lower-Body layer on which the locomotion blend tree exists:


I am controlling the blend tree with two parameters representing a direction vector: VelX and VelZ.

This direction vector determines the locomotive state of the character i.e. which direction his legs should be moving.

  • If (VelX, VelZ) is (0, 1), the character runs forward in a straight line.
  • If (VelX, VelZ) is (-1, 0.5), the character walks forward while strafing to the left.
  • If (VelX, VelZ) is (0.5, -1), the character runs backwards while slightly strafing to the right
  • etc...

This is the gist of the code which both a) sets the (VelX, VelZ) direction vector [Left Stick] i.e. LOCOMOTION and b) rotates the model to aim [Right Stick] i.e ROTATION:

private Vector3 lastLeftStickInputAxis;  // stores the axis input from the left stick between frames

private void Update()
{
    /* START LOCOMOTION */

    // Get the axis from the left stick (a Vector2 with the left stick's direction)
    var leftStickInputAxis = inputManager.LeftAxis;
    
    // Get the angle between the the direction the model is facing and the input axis vector
    var a = SignedAngle(new Vector3(leftStickInputAxis.x, 0, leftStickInputAxis.y), model.transform.forward);
    
    // Normalize the angle
    if (a < 0)
    {
        a *= -1;
    }
    else
    {
        a = 360 - a;
    }
    
    // Take into consideration the angle of the camera
    a += Camera.main.transform.eulerAngles.y;

    var aRad = Mathf.Deg2Rad*a; // degrees to radians
    
    // If there is some form of input, calculate the new axis relative to the rotation of the model
    if (leftStickInputAxis.x != 0 || leftStickInputAxis.y != 0)
    {
        leftStickInputAxis = new Vector2(Mathf.Sin(aRad), Mathf.Cos(aRad));
    }
    
    float xVelocity = 0f, yVelocity = 0f;
    float smoothTime = 0.05f;

    // Interpolate between the input axis from the last frame and the new input axis we calculated
    leftStickInputAxis = new Vector2(Mathf.SmoothDamp(lastLeftStickInputAxis.x, leftStickInputAxis.x, ref xVelocity, smoothTime), Mathf.SmoothDamp(lastLeftStickInputAxis.y, leftStickInputAxis.y, ref yVelocity, smoothTime));
    
    // Update the Animator with our values so that the blend tree updates
    animator.SetFloat("VelX", leftStickInputAxis.x);
    animator.SetFloat("VelZ", leftStickInputAxis.y);
    
    lastLeftStickInputAxis = leftStickInputAxis;

    /* END LOCOMOTION */


    /* START ROTATION */

    // Get the axis from the right stick (a Vector2 with the right stick's direction)
    var rightStickInputAxis = inputManager.RightAxis; 
    if (rightStickInputAxis.x != 0 || rightStickInputAxis.y != 0)
    {
        float angle2 = 0;
        if (rightStickInputAxis.x != 0 || rightStickInputAxis.y != 0)
        {
            angle2 = Mathf.Atan2(rightStickInputAxis.x, rightStickInputAxis.y)*Mathf.Rad2Deg;
            if (angle2 < 0)
            {
                angle2 = 360 + angle2;
            }
        }
    
        // Calculate the new rotation for the model and apply it
        var rotationTo = Quaternion.Euler(0, angle2 + Camera.main.transform.eulerAngles.y, 0);
        model.transform.rotation = Quaternion.Slerp(model.transform.rotation, rotationTo, Time.deltaTime*10);
    }

    /* END ROTATION */
}

private float SignedAngle(Vector3 a, Vector3 b)
{
    return Vector3.Angle(a, b) * Mathf.Sign(Vector3.Cross(a, b).y);
}

The soldier model and animations are from Mixamo.

Thursday, December 12, 2013

Keeping track of cooldowns with a helper class in Unity 3D

For my current project, I wrote a simple class to keep track of my cooldowns.

So for example, my character can fire every 2 seconds, jump every 4 seconds and sprint every 3.142 seconds; and this class takes care of the cooldown timers for me.

Here's how I use it:

public class Player : MonoBehaviour 
{
    private CooldownTimer firingCooldown;
    private CooldownTimer sprintCooldown;

    private void Awake() 
    {
        firingCooldown = new CooldownTimer(2f); // the player can fire every 2 seconds
        sprintCooldown = new CooldownTimer(3.142f); // the player can sprint every 3.142 seconds
    }

    private void Update() 
    {
        if (Input.GetButtonDown("Fire") && firingCooldown.CanWeDoAction()) 
        {
            firingCooldown.UpdateActionTime();
            // Do firing logic            
        }

        if (Input.GetButtonDown("Sprint") && sprintCooldown.CanWeDoAction()) 
        {
            sprintCooldown.UpdateActionTime();
            // Do sprinting logic            
        }
    }
}

And this here's the CooldownTimer class:

using System;

public class CooldownTimer
{
    private float? LastActionDone { get; set; }
    private float IntervalSeconds { get; set; }

    public CooldownTimer(float intervalSeconds)
    {
        IntervalSeconds = intervalSeconds;
    }

    public void UpdateActionTime()
    {
        LastActionDone = Time.time;
    }

    public bool CanWeDoAction()
    {
        var canWeDoAction = true;
        if (LastActionDone.HasValue)
        {
            var secondsSinceLastAction = Time.time - LastActionDone;
            canWeDoAction = secondsSinceLastAction > IntervalSeconds;
        }

        return canWeDoAction;
    }
}

Update 1

With a tip from Petr Kolda (Facebook), I've now modified the class to use Time.time instead of DateTime.Now.

Wednesday, December 11, 2013

Opening multiple instances of Unity 3D

To open multiple instances of Unity 3D, go to Edit > Preferences, and from there tick the "Always Show Project Wizard" checkbox:

Pixel Perfect sprites in Unity 2D

In Unity 4.3, native 2D tools were introduced in Unity 3D. So, armed with a bunch of 1024x768 sprites from an old game I wrote, I decided to try out the new 2D tools by trying to port the old game to Unity 2D.

But the first issue I encountered when dragging in my first sprite to the scene was this:


Notice how even though my game resolution is set to 1024x768 (top corner) and my water image is 1024x768 and centered on the screen, the sprite (SpriteRenderer) doesn't fill the screen as it should.

The way to fix this is by changing the Size of your orthographic Camera.

To calculate the Size for your Camera, use this: Camera Size = (GameTargetHeight / 2) / PixelsToUnits

By default, Pixels To Units is set to 100.

So, since my game targets a resolution of 1024x768, my Camera Size would be: (768/2)/100 = 3.84


And as you can see, that fixes the problem beautifully:


Thursday, September 5, 2013

Unity Helper Methods #4: InvokeInSeconds

/// <summary>
/// Invokes an action after waiting for a specified number of seconds
/// </summary>
/// <param name="waitSeconds">The number of seconds to wait before invoking</param>
/// <param name="invoke">The action to invoke after the time has passed</param>
public static IEnumerator InvokeInSeconds(float waitSeconds, Action invoke)
{
    yield return new WaitForSeconds(waitSeconds);
    invoke();
}

Typical Usage

Now I know that Unity already has its own Invoke method but Unity's method only accepts a string specifying the method name.

I wrote this method to be able to specify an anonymous lambda instead of the string.

Note that the method's return type is IEnumerator since it yields, therefore we must invoke it with StartCoroutine.

StartCoroutine(InvokeInSeconds(0.5f, () => Destroy(gameObject))); // Destroy the gameObject in 0.5 seconds

Unity Helper Methods #3: GetRandomEnum

/// <summary>
/// Returns a random enum from the specified enum type
/// </summary>
/// <typeparam name="T">The enum</typeparam>
public static T GetRandomEnum<T>()
{
    Array values = Enum.GetValues(typeof(T));
    return  (T)values.GetValue(UnityEngine.Random.Range(0, values.Length));
}

Typical Usage

Fairly simple; returns a random enum value from an enum type.
enum EnemyModels
{
    Knight,
    FrailOldLady,
    Copernicus,
    BrianMay,
    MalboroGuy
}

void SpawnEnemy() 
{
    EnemyModels modelType = GetRandomEnum<EnemyModels>();
    // Now we have a random enemy model type.
}

Unity Helper Methods #2: BoxCollider.GetPointInCollider

/// <summary>
/// Returns a random world point inside the given BoxCollider
/// </summary>
public static Vector3 GetPointInCollider(this BoxCollider area)
{
    var bounds = area.bounds;
    var center = bounds.center;

    var x = UnityEngine.Random.Range(center.x - bounds.extents.x, center.x + bounds.extents.x);
    var z = UnityEngine.Random.Range(center.z - bounds.extents.z, center.z + bounds.extents.z);

    return new Vector3(x, 0, z);
}

I normally use this method to get a random spawnpoint within my spawn area represented with a BoxCollider (set to a trigger of course).

Notice how I hardcode Y to 0 because the Y position is irrelevant to me since that is set by code outside of this method.

public BoxCollider spawnArea;

void SpawnWhatever() 
{
    Vector3 spawnPoint = spawnArea.GetPointInCollider();
    // Spawn something at the random spawnpoint we got
    // ...
}

Unity Helper Methods #1: Animator.SetLayerWeights

/// <summary>
/// Sets the weight of all the layers in the specified Animator
/// </summary>
/// <param name="animator">The animator</param>
/// <param name="totalLayers">The number of layers this animator contains</param>
/// <param name="weight">The value of the weight</param>
public static void SetLayerWeights(this Animator animator, int totalLayers, float weight)
{
    for (int i = 0; i < totalLayers; i++)
    {
        animator.SetLayerWeight(i + 1, weight);
    }
}

Description

Starting with a fairly trivial method; setting the weight of 'all' the layers of an Animator. When a game starts, Unity by default sets all the layers of the Animators' Controllers to 0.

Unfortunately, the method needs to be supplied with the number of layers that the Animator contains because I haven't yet found a way how to get the number of layers programmatically.

Typical Usage

I use this method at the start of a game to set the weight of all the layers to 1.

So, if I know that I have 4 layers for a particular Animator:
animator.SetLayerWeights(4, 1); // Sets the weight of all (4) the layers of my animator

Tuesday, May 7, 2013

Coloring individual characters in an NGUI UILabel text

For the game project that I'm currently working on, I needed to find an easy way to color individual characters in the text of an NGUI UILabel.

Fortunately, the solution is pretty simple. When the supportEncoding boolean field on a UILabel is set to true, the text supports color encoding in the [RRGGBB] format.

This means that we can have write text such as the following (the [-] is used to revert to a previous color):

[FF0000]Red[-] [00FF00]Green[-] [0000FF]Blue[-]


The reason I needed to do this was because we want the leading zeros in the Score UILabel to have a different colour than the actual score. And for that, I wrote this neat little method to format my current score to a string with a predefined number of leading zeros and then color those leading zeros independent from the main colour of the label text.

private string FormatScore(int score, string leadingZerosRGBColor, int totalDigits)
{
    var scoreString = score.ToString(CultureInfo.InvariantCulture);
    var zeros = totalDigits - scoreString.Length;
    if (score == 0)
    {
        scoreString = String.Empty;
        zeros++;
    }

    return String.Format("[{0}]{1}[-]{2}", leadingZerosRGBColor, new string('0', zeros <= 0 ? 0 : zeros), scoreString);
}

And the end result pretty much looks like our designer intended:


Friday, April 26, 2013

Using the Blogger API to search within a post's HTML content

A couple of months ago I wanted to switch the syntax highlighter I used to have on this blog to SunlightJS. Thing is though, I didn't want to go through every individual post I had written before and check whether they are using the (old) syntax highlighter to update their HTML markup.

Another problem was that the only way I would be able to truly know if a particular post is using the old syntax highlighter was by going through it's HTML content and determine whether the post currently has a tag like the following: <pre class="

The issue here is that the normal Google driven searchbox packaged with Blogger (the one you see on the right hand side) does not search through a posts' HTML content but rather through its textual content only which means it was useless for my task.

Because of this, I decided to write a script to semi-automate this task for me. The reason I say that the script semi-automates the job is because although I wanted it to show me all the posts in which I had used the old highlighter before, I could not risk making it to update the blog post automatically to use the new syntax highlighter because that would have involved HTML parsing and it was not worth the hassle. Besides, I didn't want to risk ruining my old posts because of a script fuckup.

So what the script does is it uses the Blogger API to batch-fetch all my previous blog posts, go through each posts' individual HTML content and notify me whether that particular post is using the old syntax highlighter. Searching is done using the regular expression engine and for my case, the function was pretty trivial:

getOccurences = function(haystack, needle) {
    var matches = haystack.match(new RegExp(needle, "g"));
    return matches ? matches.length: 0;
}

The Blogger API url I used to fetch my posts' details is as follows:

https://www.googleapis.com/blogger/v3/blogs/<blogid>/posts?key=<API key>

For the script to work I needed to provide it with three things:

Here's a demo of the script in action: http://jsfiddle.net/ydtuc/77/.

And this is how it looks like:


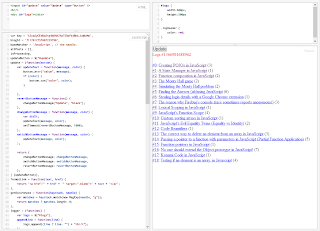
From the live demo (or the screenshot), you can see the output of the script in the bottom right pane. The script nicely formats each of the returned matches in a way that if I click on the #number of the post, it would take me to the actual blog post and clicking on the name of the post takes me to the Blogger editor for that current post so that I can easily update it. The number in parentheses next to the title of the post is the total number of occurrences the needle appears in the haystack.

This is the full script:

var key = 'AIzaSyCEsBaStg4bOHA2Yp75OqfbjBkk_kq0cMw',
    blogId = '7117612757607239790',
    baseMatcher = 'JavaScript', // the needle.
    allPosts = [],
    isProcessing,
    updateButton = $("#update"),
    update = (function (button) {
        var updateText = function (message, color) {
            button.attr("value", message);
            if (color) {
                button.css("color", color);
            }

        },
            revertButtonMessage = function () {
                changeButtonMessage("Update", "black");
            },
            changeButtonMessage = function (message, color) {
                var didIt;
                updateText(message, color);
                setTimeout(revertButtonMessage, 1000);
            },
            switchButtonMessage = function (message, color) {
                updateText(message, color);
            };

        return {
            changeButtonMessage: changeButtonMessage,
            switchButtonMessage: switchButtonMessage,
            revertButtonMessage: revertButtonMessage
        };
    }(updateButton)),
    formatLink = function (text, href) {
        return '<a href="' + href + '" target="_blank">' + text + '</a>';
    },
    getOccurences = function (haystack, needle) {
        var matches = haystack.match(new RegExp(needle, "g"));
        return matches ? matches.length : 0;
    },
    logger = (function () {
        var logs = $("#logs"),
            appendLine = function (line) {
                logs.append((line ? line : "") + "<br/>");
            };

        return {
            log: function (items) {
                appendLine('<span class="logHeader">Logs #' + new Date().getTime() + '</span>');
                appendLine();
                $.each(items, function (i, item) {
                    appendLine(formatLink('#' + i, item.url) + ': ' + formatLink(item.title, "http://www.blogger.com/blogger.g?blogID=" + blogId + "#editor/target=post;postID=" + item.id) + ' (' + getOccurences(item.content, baseMatcher) + ')');
                });
                appendLine();
            },
            clear: function () {
                logs.html('');
            }
        };
    }()),
    filter = function (items, predicateForPass) {
        var i = 0,
            j = items.length,
            item, passed = [],
            inc = 0;

        for (; i < j; ++i) {
            item = items[i];
            if (!predicateForPass(item)) {
                continue;
            }

            passed.push(item);
        }

        return passed;
    },
    getPosts = function (pageToken) {
        var url = 'https://www.googleapis.com/blogger/v3/blogs/' + blogId + '/posts?key=' + key,
            get = function (token) {
                var pagedUrl = url + (token ? ("&pageToken=" + token) : "");
                $.get(pagedUrl, function (response) {
                    var token = response.nextPageToken;
                    allPosts = allPosts.concat(response.items);

                    if (token) {
                        return get(token);
                    }

                    isProcessing = false;
                    update.changeButtonMessage("Finished", "green");
                    var filtered = filter(allPosts, function (item) {
                        var preTotal = getOccurences(item.content, baseMatcher),
                            preNewSyntaxHighlighter = getOccurences(item.content, baseMatcher + "sunlight");
                        return (preTotal - preNewSyntaxHighlighter) > 0;
                    });

                    console.log(filtered);
                    logger.clear();
                    logger.log(filtered);
                    allPosts.length = 0;
                });
            };

        update.switchButtonMessage("Getting posts...", "green");
        isProcessing = true;

        get(pageToken);
    };
updateButton.click(function () {
    if (isProcessing) {
        return update.changeButtonMessage("Busy; try again later", "red");
    }

    getPosts();
});

getPosts();

Friday, April 19, 2013

Fading a UITexture's opacity within a panel in NGUI

Here is a common scenario I'm commonly finding myself into: changing a UITexture's opacity using its parent UIPanel's alpha field.

The first time I tried this out, I couldn't get it to work. I was changing the opacity of the UIPanel using the alpha field but the UITexture inside the panel wasn't fading.


Long story short, you need to change the Shader of your UITexture to something like Unlit/Transparent Colored:


And this will give you the result you desired:


This is how it can be done programatically in C#:

var uiTexture = powerupTexture.AddComponent<UITexture>();
uiTexture.shader = Shader.Find("Unlit/Transparent Colored");

Friday, April 12, 2013

Clearing the browser cache of the Unity Web Player

For my current Unity web project, I am downloading scenes as AssetBundles hosted on my server, and now I have found myself constantly uploading the updated scenes whenever I make these (constant) changes.

Problem is, when I try the game online to see how the downloaded scene looks, my main game file which is downloading these scenes keeps on using the cached scenes from before.

That's because I am downloading the AssetBundles using WWW.LoadFromCacheOrDownload

To clear the cache, just head on over to http://unity3d.com/webplayer_setup/setup-3.x/ where you will see something like this:


And from there, you can simply delete the cache, or even make sure that while you're still working on the game, don't keep a cache at all.

Thursday, April 11, 2013

Showing a Kongregate user's avatar image in a Unity 3D game

I decided that the game I'm currently working on is going to be tied to Kongregate, and since I'm doing that, might as well try to use as many features of the API as I can.

One of the features I'm trying to integrate in my game is the ability to render a Kongregate user's avatar in the game itself. For this tutorial, I will be using Kongregate's JSON REST API to fetch user data.

After skimming through the Kongregate API documentation, I found the page about the user-info REST call.

The url for a user-info call is formatted as follows: http://www.kongregate.com/api/user_info.json?username=<username> where username is obviously the username for the user account you're searching for.

This provides you with a response such as the following:

{
   "friends":[],
   "muted_users":[],
   "friend_ids":[],
   "muted_user_ids":[],
   "user_id":3590097,
   "username":"agnt666",
   "private":false,
   "page_num":1,
   "num_pages":1,
   "success":true,
   "user_vars":{
      "username":"agnt666",
      "level":3,
      "points":165,
      "avatar_url":"http://cdn4.kongcdn.com/assets/resize-image/50x50/assets/avatars/defaults/ant.png",
      "chat_avatar_url":"http://cdn4.kongcdn.com/assets/resize-image/16x16/assets/avatars/defaults/ant.png",
      "developer":false,
      "moderator":false,
      "admin":false,
      "gender":"Male",
      "age":25,
      "game_title":"Typocalypse 3D",
      "game_url":"http://www.kongregate.com/games/agnt666/typocalypse-3d"
   }
}

And the above response provides me with what I needed; the avatar url:

"avatar_url" : "http://cdn4.kongcdn.com/assets/resize-image/50x50/assets/avatars/defaults/ant.png"


Getting the avatar url in C#
Getting the username of the current Kongregate logged-in user is beyond the scope of this post (TODO: maybe in another one), so for this code I'm assuming you already have it.

public UITexture kongregateTexture;

IEnumerator FetchUserDetails(string username) {
    // Build the url for the REST call
    var detailsUrl = String.Format("/api/user_info.json?username={0}", username);

    // Do the call 
    var www = new WWW(detailsUrl);

    // ...and wait until we get back a response
    yield return www;

    // Get the JSON response text
    var responseText = www.text;

    // Deserialize it into a statically typed object to read to be able to read it's contents
    // For this demo, I'm using this JSON deserializer script: https://raw.github.com/gist/1411710/MiniJSON.cs
    var deserialized = MiniJSON.Json.Deserialize(responseText) as Dictionary<string,object>;

    //// TODO: a null check would be nice here

    // Get the user_vars object
    var userVars = deserialized["user_vars"] as Dictionary<string,object>;

    // Read the avatar url
    var avatar_url = user_vars["avatar_url"].ToString(); // http://cdn4.kongcdn.com/assets/resize-image/50x50/assets/avatars/defaults/ant.png

    //// Do the same routine to fetch the image
    var wwwAvatar = new WWW(avatar_url);
    yield return wwwAvatar;

    // And now we have the texture!
    Texture2D avatarTexture = wwwAvatar.texture;

    // Render the texture (I'm using an NGUI SimpleTexture widget)
    kongregateTexture.mainTexture = avatarTexture;
}

And this is the result with a shitty border I made around it:


Possible exception: Security Exception: No valid crossdomain policy available to allow access
Notice that in the above code, to build the url of the REST call, I used Kongregate's relative url: "/api/user-info.json...".

If I had used this instead String.Format("http://www.kongregate.com/api/user_info.json?username={0}", username);, I would have received this exception when running the game and looking at the debug log (console):


This error is thrown when reading the text field of the WWW instance (get_text).

So be very careful about that when doing the REST calls; always use relative urls! ...and this of course works because the game is hosted on http://www.kongregate.com.

Monday, April 8, 2013

Auto-Generating generic Tuple classes with T4 in C#

And yet again, here's another perfect example for using the T4 code generation toolkit in Visual Studio.

For a recent project, I wanted to use the Tuple class provided in the .NET Framework...problem was, I was stuck with .NET 3.5 and the Tuple class was introduced in version 4 of the framework. So, instead of writing a single Tuple class by hand (which would have been very trivial to do), I decided to write a T4 template which would generate all the Tuple classes I needed automatically.

The template itself is very trivial and the number of Tuple classes it generates is dependent on the value that I specify in the max variable at the top of the template.

For each of the Tuple classes the template generates, it creates a contructor which accepts all of the properties that the tuple will contain and also the actual properties that will be accessed from the outside.

Here's an example of what the template autogenerates for me when using max = 3 (granted, the first class it generates is a bit pointless but that can be easily omitted from within the template if it bothers you):
namespace FunWithTuples
{
    /// <summary>
    /// Represents a 1-tuple
    /// </summary>
    public class Tuple<T1>
    {
        public T1 Item1 { get; set; }

        public Tuple(T1 item1) 
        {
            Item1 = item1;
        }
    }

    /// <summary>
    /// Represents a 2-tuple
    /// </summary>
    public class Tuple<T1, T2>
    {
        public T1 Item1 { get; set; }
        public T2 Item2 { get; set; }

        public Tuple(T1 item1, T2 item2) 
        {
            Item1 = item1;
            Item2 = item2;
        }
    }

    /// <summary>
    /// Represents a 3-tuple
    /// </summary>
    public class Tuple<T1, T2, T3>
    {
        public T1 Item1 { get; set; }
        public T2 Item2 { get; set; }
        public T3 Item3 { get; set; }

        public Tuple(T1 item1, T2 item2, T3 item3) 
        {
            Item1 = item1;
            Item2 = item2;
            Item3 = item3;
        }
    }
}


And this is the full T4 Template:

<#@ template debug="false" hostspecific="false" language="C#" #>
<#@ assembly name="System.Core" #>
<#@ import namespace="System.Linq" #>
<#@ import namespace="System.Text" #>
<#@ import namespace="System.Collections.Generic" #>
<#@ output extension=".cs" #>

<#
var max = 3; // The total number of classes to generate
#>
namespace FunWithTuples
{
<#
max += 1;
for (var i = 1; i < max; ++i) {
#>
    /// 
    /// Represents a <#=i#>-tuple
    /// 
    public class Tuple<#=GetGenericTypesSignature(i)#>
    {
<#
for (var j = 1; j < i + 1; ++j) {
#>
        public T<#=j#> Item<#=j#> { get; set; }
<#
}
#>

        public Tuple(<#=GetConstructorArguments(i)#>) 
        {
<#
for (var j = 1; j < i + 1; ++j) {
#>
            Item<#=j#> = item<#=j#>;
<#
}
#>
        }
    }

<#
}
#>
}
<#+
    public string GetGenericTypesSignature(int total) {
        return String.Format("<{0}>", String.Join(", ", Enumerable.Range(1, total).Select(n => "T" + n).ToArray()));
    }

    public string GetConstructorArguments(int total) {
        return String.Join(", ", Enumerable.Range(1, total).Select(n => String.Format("T{0} item{0}", n)).ToArray());
    }
#>


Friday, April 5, 2013

Absolute value bars for fractions in LaTeX

The simplest way on how to include |absolute value| bars in LaTeX is to use the this notation: \left| and \right|.

Here's an example:

y = \left|\frac{1}{x}\right|

And that would be rendered as:


Common CIL incantations

Since I recently decided to try my hand at CIL by writing assemblies by hand, I'm now writing this post where I will list down a couple of basic CIL routines.

I am of course primarily writing this post for myself so that future me will have a reference if he (I?) decides to do something with it again.

Hello World
.assembly helloworld {}
.assembly extern mscorlib {}

.method public static void Main () {
    .entrypoint
    ldstr "Hello World!"
    call void [mscorlib]System.Console::WriteLine(string)
    ret
}
Including external assemblies
.assembly extern mscorlib {}
Pushing a 32 bit integer constant to the stack
ldc.i4 42
Pushing a 64 bit integer constant to the stack
ldc.i8 829190
Pushing a string constant to the stack
ldstr "Andreas"
Declaring and loading unnamed variables (popping elements off the stack)
.locals init (int32, string) // init specifies that the variables must be initialized to the default types
ldc.i4 42
stloc.0 // storing the 32 bit integer at position 0 by popping it off the stack
ldstr "CIL"
stloc.1
Defining a class
.class MathHelpers extends [mscorlib]System.Object {
    .method void .ctor() { // Constructor
        ldarg.0
        call instance void [mscorlib]System.Object::.ctor()
    }

    .method public instance int32 Inc(int32) { // Instance method; the instance keyword can be omitted
        ldarg.0
        ldc.i4.1
        add
        ret
    }
    
    .method public static int32 Add(int32 n, int32 m) {  // Static method
        ldarg n
        ldarg m
        add
        ret
    }
}
Invoking methods from external assemblies
.assembly extern mscorlib {}

// ...

ldstr "Writelining"
call void [mscorlib]System.Console::WriteLine(string)
Invoking an instance method
.locals init (class MathHelpers mh)

newobj instance void MathHelpers::.ctor()
stloc mh

call instance void MathHelpers::Show()
Invoking a static method
call void MyNamespace.MyClass::StaticMethod()
Using an array
.locals init (string[] names);

.ldc.i4.4 // the int32 constant that's used for the size of the array: new string[4]
newarr string
stloc names

// Add element 0
ldloc names
ldc.i4.0 // array index
ldstr "Dreas"
stelem.ref

// Add element 1
ldloc names
ldc.i4.1 // array index
ldstr "John"
stelem.ref

Adding a line break for IntelliSense in XML documentation comments

This is a quick post on how to insert a line break for XML documentation comments in C#.

The easiest way I've found is to use a non breaking space (ASCII code 255) in combination with the paragraph tags: <para>

To insert the non breaking space, press ALT + 255 (from the numeric keypad).

Here's an example:

/// <summary>
/// <para>This method does everything.</para>
/// <para> </para>
/// <para>...and I mean everything.</para>
/// </summary>
private void DoEverything() {

And this is how it looks in IntelliSense:


Tuesday, February 26, 2013

Preventing Vim from automatically inserting line breaks

I recently had a very frustrating issue with Vim where it was inserting a line break automatically for me whenever a line exceeded the 80 character mark.

After some searching around, I realized that I had textwidth (tw) set to 79 in my _vimrc file. From the documentation:

textwidth.
Maximum width of text that is being inserted. A longer line will be broken after white space to get this width. A zero value disables this.

So as you can see from the documentation, fixing it was very trivial: set tw = 0