Thursday, April 1, 2010

Removing the default span from a Custom Web Server Control

If you have ever developed a custom Web Server Control for ASP.NET, you may have realized that the Web Server Control automatically encapsulates your control inside a span tag:


This is because the WebControl's constructor sets HtmlTextWriterTag.Span as the default begin tag:

protected WebControl() : this(HtmlTextWriterTag.Span) { 

}

Fixing the issue

To fix this, all you need to do is override the Render method in your Control class , as follows:

protected override void Render(HtmlTextWriter writer)
{
    RenderContents(writer);
}

That way, you will be suppressing the outer span tag from being rendered.

Further Explanation

The following is the implementation of the Render method inside the WebControl class:

protected internal override void Render(HtmlTextWriter writer)
{
    this.RenderBeginTag(writer);
    this.RenderContents(writer);
    this.RenderEndTag(writer);
}

As you can see, it's calling the RenderBeginTag method of the same WebControl class:

public virtual void RenderBeginTag(HtmlTextWriter writer)
{
    this.AddAttributesToRender(writer);
    HtmlTextWriterTag tagKey = this.TagKey;
    if (tagKey != HtmlTextWriterTag.Unknown)
    {
        writer.RenderBeginTag(tagKey);
    }
    else
    {
        writer.RenderBeginTag(this.TagName);
    }
}

The RenderBeginTag is rendering tagKey, which is set in the constructor we saw earlier on:

private HtmlTextWriterTag tagKey;

protected WebControl() : this(HtmlTextWriterTag.Span) { }
public WebControl(HtmlTextWriterTag tag)
{
    this.tagKey = tag;
}

Therefore, by overriding the Render method in our WebControl subclass to only call the RenderContents method, we will be bypassing the following methods that render the span tag: RenderBeginTag and RenderEndTag.

protected override void Render(HtmlTextWriter writer)
{
    RenderContents(writer);

    /* instead of: 

    Render(HtmlTextWriter writer)
    {
        this.RenderBeginTag(writer);
        this.RenderContents(writer);
        this.RenderEndTag(writer);
    }

     */
}

Wednesday, March 31, 2010

Transferring files with netcat


Netcat is a computer networking service for reading from and writing network connections using TCP or UDP. Netcat is designed to be a dependable “back-end” device that can be used candidly or easily driven by other programs and scripts.


netcat is an application that is mostly used for "backdoor" purposes, and in this tutorial, I will show you how to transfer a file over a network via netcat.

If you're using Windows, you can download netcat from here. Once it is downloaded, copy nc.exe to C:\Windows\System32 so that you can access it from everywhere.

Transferring files


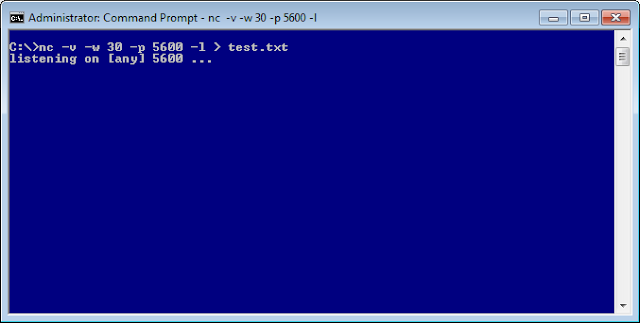
First run the following command on the receiving computer:

nc -v -w 30 -p 5600 -l > test.txt


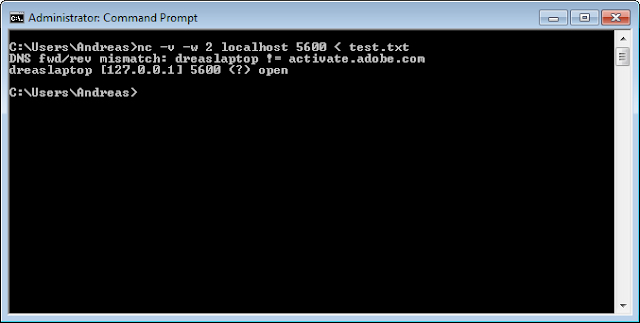
After the receiving computer starts listening (in this case, on port 5600), run the following command on the sending computer:

nc -v -w 2 10.0.0.1 5600 < test.txt

where 10.0.0.1 is the address of the receiving computer. In this case, it's localhost because I'm transferring files over the same computer, for demonstration purposes.


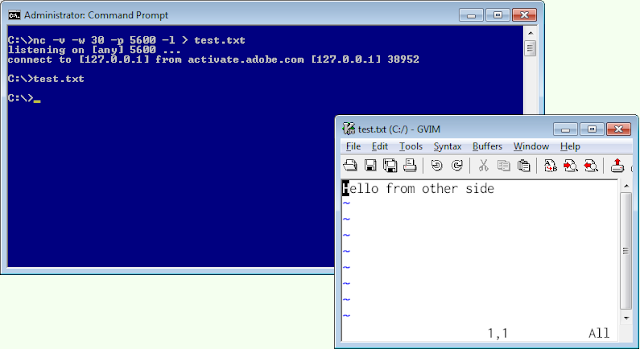
The file was now transferred to the other side:

Sunday, March 7, 2010

Java's Iterators and Iterables

What is an Iterator?

From Wikipedia:


In computer science, an iterator is an object that allows a programmer to traverse through all the elements of a collection, regardless of its specific implementation.


The point of using an iterator is to allow the the client to iterate over the collection of objects, without exposing implementation details. This gives you the benefit to change what collection the Iterator iterates over and how each element is served, without making any change the client's code.

Making custom collections iterable

Let's say we have our own custom Vector-based collection, GameCollection, that stores Games and we want to make this collection iterable (over its stored Games) by making it implement the Iterator inteface:

public class GameCollection implements Iterable<Game> {
 private Vector<Game> games;
 
 public GameCollection() {
  games = new Vector<Game>();
 }
 
 public void add(Game game) {
  games.add(game);
 }

 @Override
 public Iterator<Game> iterator() {
  return games.iterator();
 }
}

The client can then use the above collection as follows:

GameCollection gc = new GameCollection();
Iterator<game> gameIterator = gc.iterator();

while (gameIterator.hasNext()) {
 Game g = gameIterator.next();
 System.out.println(g.getName());
}

Or better yet, make use of Java's for-each statement:

GameCollection gc = new GameCollection();
for (Game g : gc) {
 System.out.println(g.getName());
}

As you can see from the above code, the client doesn't know that we are using a Vector to store our Games in the GameCollection. Infact, we can later change the GameCollection to store the Games in a LinkedList or an Array, and yet the client wouldn't need to change his iteration code (code above) to suit for our changes.

Multiple iterators for a custom collection

What if we now want our GameCollection to offer two iterable solutions? Say we want our GameCollection to iterate over both Games and also GameConsoles?

The first thing that comes to mind is to try and make the GameCollection implement two Iterator interfaces using different generic arguments:

public class GameCollection implements Iterable<Game>, Iterable<GameConsole>

but unfortunately, the above doesn't compile. Therefore, as a workaround to such an issue, we can make use of Java's ability to allow for inner classes:

public class GameCollection  {
 private Vector<Game> games;
 private Vector<GameConsole> consoles;
 
 private class Games implements Iterable<Game> {
  @Override
  public Iterator<Game> iterator() {
   return games.iterator();
  }
 }
 
 private class Consoles implements Iterable<GameConsole> {
  @Override
  public Iterator<GameConsole> iterator() {
   return consoles.iterator();
  }
  
 }
 
 public GameCollection() {
  games = new Vector<Game>();
  consoles = new Vector<GameConsole>();
 }
 
 public void add(Game game) {
  games.add(game);
 }
 
 public void add(GameConsole console) {
  consoles.add(console);
 }

 public Games games() {
  return new Games();
 }
 
 public Consoles consoles() {
  return new Consoles();
 }
}

With the above two inner classes and the public methods games() and consoles(), the client can iterate over the collections like such:

GameCollection gc = new GameCollection();

//Add games and consoles with gc.add()

for (Game g : gc.games()) {
 System.out.println(g.getName());
}

for (GameConsole g : gc.consoles()) {
 System.out.println(g.getName());
}

Creating custom iterators

Up till this point, we have only used iterators that are in built with Java's existing collections; but what if we want our own custom iterator? We can use Java's java.util.Iterator interface to build our own iterator.

In the following example, I have created a Circular Iterator:

public class CircularGamesIterator implements Iterator<Game> {

 private Vector<Game> list;
 private int currentPosition;
 
 public CircularGamesIterator(Vector<Game> games) {
  list = games;
  currentPosition = 0;
 }
 
 @Override
 public boolean hasNext() {
  return currentPosition < list.size();
 }

 @Override
 public Game next() {
  Game el = list.elementAt(currentPosition);
  currentPosition = (currentPosition + 1) % list.size(); 
  return el;
 }

 @Override
 public void remove() { }
}

The iterator() method of the GameCollection class can then be modified to return an instance of the CircularGamesIterator:

public class GameCollection implements Iterable<Game> {
 private Vector<Game> games;
 
 public GameCollection() {
  games = new Vector<Game>();
 }
 
 public void add(Game game) {
  games.add(game);
 }

 @Override
 public Iterator<Game> iterator() {
  return new CircularGamesIterator(games);
 }
}

An Iterator should not be Iterable!

I have seen some examples on the internet where people make Iterators iterable by making their Iterators implement the Iterator interface and returning this in the iterator() method:
I have removed the implementation in the methods for the following code for brevity.

public class CustomIterator implements Iterator<Game>, Iterable<Game> {

 public CustomIterator(Vector<Game> games) {
  list = games;
 }

 @Override
 public Iterator<Game> iterator() {
  return this;
 }

 @Override
 public boolean hasNext() {
   //Implementation
 }

 @Override
 public Game next() {
   //Implementation
 }

 @Override
 public void remove() { }
}

The problem with the above code can be clearly illustrated with such a method:

public static void iterateTwice(Iterable<Game> games) {
 for (Game g : games) {
  System.out.println(g.getName());
 }
 
 for (Game g : games) {
  System.out.println(g.getName());
 }
 System.out.println();
}

If you directly pass in your iterable iterator to the above method, the Games will only be printed once.

To illustrate this, let's assume that we will use the custom iterator mentioned above, CustomIterator, that implements both Iterator<Game> and Iterable<Game>. Our GameCollection implements Iterable<Game>, and its iterator() method returns new CustomIterator(games);. Now, let's also say that GameCollection also provides a method games() that also returns new CustomIterator(games);.

Here's an example that illustrates this:
GameCollection gc = new GameCollection();

gc.add(new Game("Broken Sword"));
gc.add(new Game("Grim Fandango"));
gc.add(new Game("Maniac Mansion"));

System.out.println("Printing the iterable collection, GameCollection");
iterateTwice(gc);

System.out.println("Printing the iterable iterator, CustomIterator");
CustomIterator gamesIterator = gc.games();
iterateTwice(gamesIterator);

The output of the above code is as follows:
Printing the iterable collection, GameCollection
Broken Sword
Grim Fandango
Maniac Mansion
Broken Sword
Grim Fandango
Maniac  Mansion

Printing the iterable iterator, CustomIterator
Broken Sword
Grim Fandango
Maniac Mansion

Notice how when passing the iterable CustomIterator iterator to the method, the Games were only printed once, whereas when we passed in the GameCollection that implements Iterable, the Games were printed twice.

This is because when CustomIterator was passed in, the second for loop terminated immediately.

Saturday, February 27, 2010

Converting Excel tables to LaTeX tables

Creating a table in Microsoft Excel is far more easier than creating a table in LaTeX. Thus in this post, I will show you two ways on how you can convert the tables you produce in Excel to LaTeX format.

Method 1: excel2latex, an Excel plugin

Download the excel2latex plugin from here. Once downloaded, double click on it and it will install itself as an Excel plugin.

Once installed, you will be able to access it from the Add-ins tab in Excel:


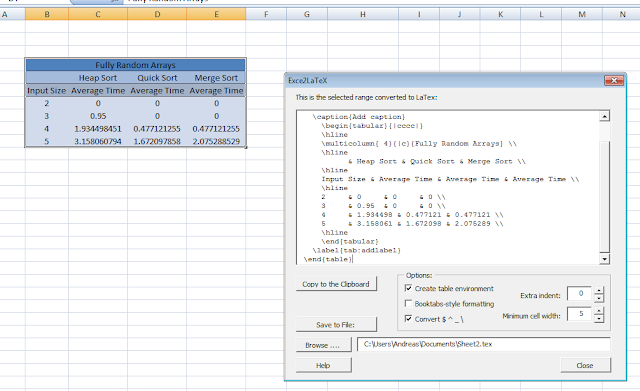
Then you can select a table and click on the 'Convert Table to Latex' plugin to render the LaTeX format:


Note that if you enable the Booktabs-style formatting checkbox, you must include the following package in preamble of your LaTeX document:

\usepackage{booktabs}

This is the full code of the table it generated (without Booktabs-style formatting):

% Table generated by Excel2LaTeX from sheet 'Sheet2'
\begin{table}[htbp]
  \centering
  \caption{Add caption}
    \begin{tabular}{|cccc|}
    \hline
    \multicolumn{ 4}{|c}{Fully Random Arrays} \\
    \hline
          & Heap Sort & Quick Sort & Merge Sort \\
    \hline
    Input Size & Average Time & Average Time & Average Time \\
    \hline
    2     & 0     & 0     & 0 \\
    3     & 0.95  & 0     & 0 \\
    4     & 1.934498 & 0.477121 & 0.477121 \\
    5     & 3.158061 & 1.672098 & 2.075289 \\
    \hline
    \end{tabular}
  \label{tab:addlabel}
\end{table}

Note: I did encounter some very minor issues with the resultant LaTeX code from excel2latex, mainly when it came to rendering the outlines of certain tables.

For example, to render the table with the same borders it had in Excel, this line generated by the plugin:

multicolumn{ 4}{|c}{Fully Random Arrays} \\

must be changed to the following (notice the extra pipeline | in {|c|}):

multicolumn{ 4}{|c|}{Fully Random Arrays} \\

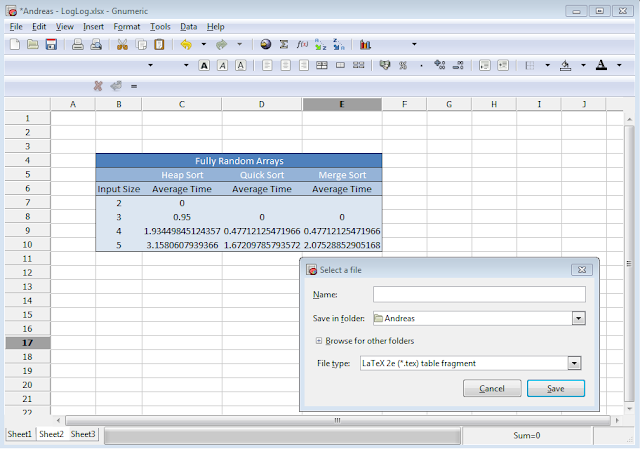
Method 2: Using GNOME's Project, Gnumeric

Gnumeric is another Spreadsheet application, but unlike Microsoft Excel, it supports the functionality of exporting spreadsheets to .tex format.


Gnumeric offers two possibilities. You can either save the spreadsheet as a table fragment, ie generating the following:

%%%%%%%%%%%%%%%%%%%%%%%%%%%%%%%%%%%%%%%%%%%%%%%%%%%%%%%%%%%%%%%%%%%%%%
%%                                                                  %%
%%  This is a LaTeX2e table fragment exported from Gnumeric.        %%
%%                                                                  %%
%%%%%%%%%%%%%%%%%%%%%%%%%%%%%%%%%%%%%%%%%%%%%%%%%%%%%%%%%%%%%%%%%%%%%%
Fully Random Arrays & & &\\
 &Heap Sort &Quick Sort &Merge Sort\\
Input Size &Average Time &Average Time &Average Time\\
2 &0 & &\\
3 &0.95 &0 &0\\
4 &1.93449845124357 &0.47712125471966 &0.47712125471966\\
5 &3.1580607939366 &1.67209785793572 &2.07528852905168\\

Or you can save the whole spreadsheet as a complete LaTeX document, in which case it is probably an overkill for our current scenario of just rendering a single table.

Why can you write arr[n] == n[arr] in C ?

Try the following program in C :

#include <stdio.h>

int main () {
  int arr[] = {42};
  printf("%d", arr[0] == 0[arr]);
  return 0;
}

The above program prints out 1...ie, true.

But why...?

Well the reason the above works is because of how arrays are represented in C. In C, when referencing an array, you're just referencing a pointer to the first element :

int arr[] = {42, 39};
int x = arr[0];
int y = *(arr + 0);
// x == y

In the *(arr + 0) example, we are accessing the first element of the array by dereferencing the pointer to the first element arr plus the 0 offset.

int arr[] = {42, 39};
int x = arr[1];
int y = *(arr + 1);
// x == y

In the above example, we are accessing the second element with index 1.

Therefore, if *(arr + 1) evaluates to arr[1], then surely *(1 + arr) evaluates to 1[arr] according to elementary math...because addition is commutative, which means that the order of the operands does not matter, as it produces the same result.

The reason for this is because since C was designed back in the 70s, computers did not have much memory and thus the C compiler didn't do much syntax checking. Therefore, something like arr[i] was blindly translated to *(arr + i)

Wednesday, February 10, 2010

Finding the logarithm of any base in Java

Unfortunately, the only methods in Java that compute the logarithm of a number are java.lang.Math.log and java.lang.Math.log10. The former returns the natural logarithm (base e) of the number and the latter returns the base 10 logarithm of the number.

To calculate the logarithm of any base in Java, we thus have to use the following method:

public double logOfBase(int base, int num) {
    return Math.log(num) / Math.log(base);
}

Why does it work?


Let's say we want to find the base 2 logarithm of 32 (method call would be logOfBase(2, 32)), which is 5.


Now if we divide the base e logarithm (ln) of our number (32) by the base e logarithm of our base (2), we get the answer we wanted:


Wednesday, February 3, 2010

Scrolling page title with JavaScript and jQuery

The following is a jQuery function I wrote that allows you to make a scrolling page title.

I admit...it's a pretty useless "feature" but I just made it to kill some time =D

Usage

The simplest usage is as follows:

$.marqueeTitle();

The above snippet will use your existing title text to scroll.

You can also pass in an object with options to alter the script's behavior. The options are the following:
  • text - Use this parameter to set custom text if you don't want the scrolling text to be taken from the title
  • dir - "left" or "right"; by default, it's set to "left"
  • speed - The time it takes, in ms, for one character rotation

Here's another example, now demonstrating the parameters:

$.marqueeTitle({
  text: "This my custom text",
  dir: "right",
  speed: 500
});

Source

(function ($) {
    var shift = {
        "left": function (a) {
            a.push(a.shift());
        },
        "right": function (a) {
            a.unshift(a.pop());
        }
    };
    $.marqueeTitle = function (options) {
        var opts = $.extend({},
        {
            text: "",
            dir: "left",
            speed: 200
        }, options),
            t = (opts.text || document.title).split("");
        if (!t) {
            return;
        }
        t.push(" ");
        setInterval(function () {
            var f = shift[opts.dir];
            if (f) {
                f(t);
                document.title = t.join("");
            }
        }, opts.speed);
    };
}(jQuery));