Sunday, May 30, 2010

Nil-coalescing in Ruby

In Ruby, you can check if an object is nil with the nil? method:

if @foo.nil? then
    @foo = Foo.new
end

But this can be shortened via the || operator:

@foo = @foo || Foo.new

Better yet, we can shorten it even more with the ||= operator:

@foo ||= Foo.new

Both the above assignments assign Foo.new to @foo if and only if @foo is nil or false, else leave @foo as it is.

Saturday, May 15, 2010

Compiling a LaTeX document with Bibtex references

To successfully compile a LaTeX document with Bibtex references, you need to execute 4 steps.

In this case, I'm assuming my document is called MyTexDoc.tex and I want to compile to the pdf file format; for the dvi file format, change the below commands to latex instead of pdflatex.

1. pdflatex MyTexDoc Creates .aux files which include the keywords of your citations
2. bibtex MyTexDoc Extracts cited publications from the .bib file file, using the .aux file and formats them according to your indicated bibliography style. Finally the results are put into a .bbl file
3. pdflatex MyTexDoc Inserts the appropriate reference indications at each citation according to your indicated bibliography style
4. pdflatex MyTexDoc Refines citation and cross references, page formatting and page numbers

Ideally, the above are stored in a shell script (Linux) or batch file (Windows) and execute that file whenever you need to compile the document.

Wednesday, May 12, 2010

Ubuntu with multiple monitors having multiple panels (taskbars)

The following is how I enabled multiple panels (taskbar in Windows) in Ubuntu for my, currently two, monitors and my nvidia card. In this tutorial, the words panel and taskbar will be used interchangeably.

First, go to your nvidia settings page with: sudo nvidia-settings and in the X Server Display Configuration section, set the Configuration of monitors to TwinView. Apply and Save to X configuration File.

After all that, Log Out so that the X Server can be restarted and your settings can be applied.

When you now log in, you should have your multiple monitors enabled and a desktop that is stretched across the monitors. Now it's time to add a panel (taskbar) to your other monitors.

Right click on your existing panel and select New Panel. Your new panel will now be added to your primary monitor. Right click on it and set it's Orientation to Bottom.

Next, hold the ALT key and drag your newly created panel to the other monitor.

The final step is to set the panel to display the windows that currently on that monitor. To do this, right click on it and select Add to Panel and choose Window List. Now you should see your windows on the new taskbar.

Thursday, May 6, 2010

Translating brainfuck code to ANSI-C code with BrainfuckToC

This is my latest project. An application that translates brainfuck code to ANSI-C code.

To download the sources, visit the Google Code brainfucktoc page.

I would also like to thank Reuben Sammut who is a contributer to the project.

Usage

bftoc <source file>

Example:

bftoc bfcode.b

This will take a brainfuck source file and output its equivalent C code.

If you want to redirect the output to a text file, run bftoc as follows:

bftoc bfcode.b > bfcode.c

Examples

Hello World
Input:
++++++++++[>+++++++>++++++++++>+++>+<<<<-]>++.>+.+++++++..+++.>++.<<+++++++++++++++.>.+++.------.--------.>+.>.
Output:
#include <stdio.h>
#include <stdlib.h>

int main () {
    char *ptr = calloc(10000, sizeof *ptr), *start = ptr;
    int i = 0;

    *ptr += 10;
    while (*ptr) {
        ++ptr;
        *ptr += 7;
        ++ptr;
        *ptr += 10;
        ++ptr;
        *ptr += 3;
        ++ptr;
        ++*ptr;
        ptr -= 4;
        --*ptr;
    }

    ++ptr;
    *ptr += 2;
    putchar(*ptr);
    ++ptr;
    ++*ptr;
    putchar(*ptr);
    *ptr += 7;
    putchar(*ptr);
    putchar(*ptr);
    *ptr += 3;
    putchar(*ptr);
    ++ptr;
    *ptr += 2;
    putchar(*ptr);
    ptr -= 2;
    *ptr += 15;
    putchar(*ptr);
    ++ptr;
    putchar(*ptr);
    *ptr += 3;
    putchar(*ptr);
    *ptr -= 6;
    putchar(*ptr);
    *ptr -= 8;
    putchar(*ptr);
    ++ptr;
    ++*ptr;
    putchar(*ptr);
    ++ptr;
    putchar(*ptr);

    free(start);
    return 0;
}

Saturday, April 10, 2010

Using the singlespace environment in an lstnewenvironment, in LaTeX

I was working on a LaTeX document and I had \linespread{1.6} set for double line spacing. But then I added some code snippets to the document with the listings package and I wanted my code to have single line spacing, rather than double line spacing. So, I tried putting them both in a new listings environment to abstract them into a single environment:

\lstnewenvironment{javacode}[2]
{
\begin{singlespace}
\lstset{language=java, label=#1, caption=#2}}
{
\end{singlespace}
}

But upon compiling, I was getting the following 'error':

Overfull \hbox (6.0pt too wide) in paragraph at lines 6--6
[][][][][][][] 
[1]) [2] [3])
*

The Fix

Upon some research, I found the following question which provided a solution to my problem.

The solution to the singlespace environment problem, as suggested by that answer, is to not use the singlespace environment but instead to use \singlespacing instead.

Therefore, this is my final working code:

\lstnewenvironment{javacode}[2]
{
\singlespacing
\lstset{language=java, label=#1, caption=#2}}
{}

Thursday, April 8, 2010

Removing the vim error: viminfo: Illegal starting char in line

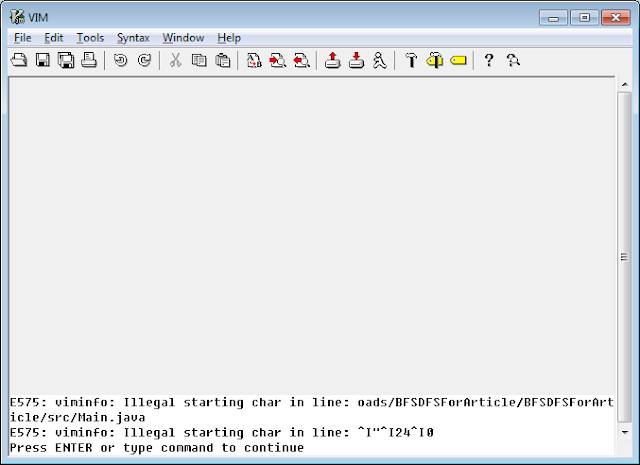
Last time, I tried opening my gVim and got the following error:


E575: viminfo: Illegal starting char in line: oads/BFSDFSForArticle/BFSDFSForArticle/src/Main.java
E575: viminfo: Illegal starting char in line: ^I"^I24^I0

After some digging around, I realized that this problem is because for some apparent reason, my viminfo file got corrupted.

This viminfo file is mostly used for temporary working data and does not contain any settings, and thus it is safe to delete it. So that's what I intended to do, but finding it was another story.

After I searched my vim installation directory without being able to find this file, I decided to completely uninstall vim and install it from scratch again. But, much to my surprise, the error was still there when I ran vim after the new installation! Which obviously means that the viminfo file was not located in my vim installation directory.

I then ran gVim with the Verbose option, -V. This option instructs vim to tell you everything that its doing, and it is controlled by levels. You can specify the level via -Vn, where n is the level of data that you want to see. By default, if you run -V, the level is 10 (-V10).

For the purposes of actually locating the viminfo file, level 1 is sufficient:

C:\Program Files\Vim\vim72>gvim -V1

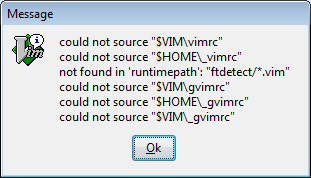
This prompted the following message box:


This gave me the information I was looking for. As you can see, the folders I am looking for are $HOME and $VIM. These are environment variables, and to actually see what paths they are mapped to, open vim and run the following commands:

:echo $HOME
:echo $VIM

Those two commands will show you the paths that the variables are mapped to. In my case, $HOME pointed to C:\Users\Andreas and $VIM pointed to C:\Program Files\Vim.

Now since I had uninstalled vim earlier on (thus completely removing C:\Program Files\Vim), the folder I checked for the file was C:\Users\Andreas.

I navigated to the folder and voila, there was the file I was searching for: _viminfo. I deleted that file, and the error was gone.

Wednesday, April 7, 2010

Disallowing access to files in an ASP.NET website with HttpForbiddenHandler

Disallowing access to files in ASP.NET is a very easy task to accomplish.

In this example, I will disallow access to the file called private.txt that is situated at the root of the website.

When I access this file normally, I get the following:


To disallow access to the file, use the Error Generator Handler HttpForbiddenHandler. This generates a 403 Forbidden error when the user tries to access that file.

To use the handler, simply add it to your <httpHandlers> section in the web.config:

<httpHandlers>
    <add verb="*" path="private.txt" type="System.Web.HttpForbiddenHandler"/>
</httpHandlers>

This is what the user will not get when he tries to access the file:


The HttpForbiddenHandler can also be used to disallow access to multiple or even folders.

In the following example, I will be disallowing access to all the files that have the .private extension:

<httpHandlers>
    <add verb="*" path="*.private" type="System.Web.HttpForbiddenHandler"/>
</httpHandlers>