
Wednesday, December 11, 2013
Opening multiple instances of Unity 3D
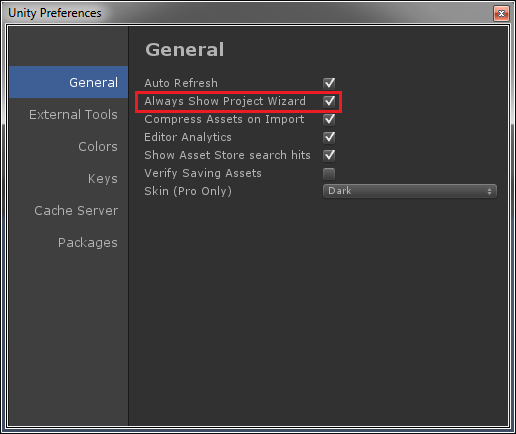
To open multiple instances of Unity 3D, go to Edit > Preferences, and from there tick the "Always Show Project Wizard" checkbox:


Pixel Perfect sprites in Unity 2D
In Unity 4.3, native 2D tools were introduced in Unity 3D. So, armed with a bunch of 1024x768 sprites from an old game I wrote, I decided to try out the new 2D tools by trying to port the old game to Unity 2D.
But the first issue I encountered when dragging in my first sprite to the scene was this:

Notice how even though my game resolution is set to 1024x768 (top corner) and my water image is 1024x768 and centered on the screen, the sprite (SpriteRenderer) doesn't fill the screen as it should.
The way to fix this is by changing the Size of your orthographic Camera.
To calculate the Size for your Camera, use this: Camera Size = (GameTargetHeight / 2) / PixelsToUnits
By default, Pixels To Units is set to 100.
So, since my game targets a resolution of 1024x768, my Camera Size would be: (768/2)/100 = 3.84

And as you can see, that fixes the problem beautifully:

But the first issue I encountered when dragging in my first sprite to the scene was this:

Notice how even though my game resolution is set to 1024x768 (top corner) and my water image is 1024x768 and centered on the screen, the sprite (SpriteRenderer) doesn't fill the screen as it should.
The way to fix this is by changing the Size of your orthographic Camera.
To calculate the Size for your Camera, use this: Camera Size = (GameTargetHeight / 2) / PixelsToUnits
By default, Pixels To Units is set to 100.
So, since my game targets a resolution of 1024x768, my Camera Size would be: (768/2)/100 = 3.84

And as you can see, that fixes the problem beautifully:

Thursday, September 5, 2013
Unity Helper Methods #4: InvokeInSeconds
/// <summary>
/// Invokes an action after waiting for a specified number of seconds
/// </summary>
/// <param name="waitSeconds">The number of seconds to wait before invoking</param>
/// <param name="invoke">The action to invoke after the time has passed</param>
public static IEnumerator InvokeInSeconds(float waitSeconds, Action invoke)
{
    yield return new WaitForSeconds(waitSeconds);
    invoke();
}
Typical Usage
Now I know that Unity already has its own Invoke method but Unity's method only accepts a string specifying the method name.I wrote this method to be able to specify an anonymous lambda instead of the string.
Note that the method's return type is IEnumerator since it yields, therefore we must invoke it with StartCoroutine.
StartCoroutine(InvokeInSeconds(0.5f, () => Destroy(gameObject))); // Destroy the gameObject in 0.5 seconds
Unity Helper Methods #3: GetRandomEnum
/// <summary>
/// Returns a random enum from the specified enum type
/// </summary>
/// <typeparam name="T">The enum</typeparam>
public static T GetRandomEnum<T>()
{
    Array values = Enum.GetValues(typeof(T));
    return  (T)values.GetValue(UnityEngine.Random.Range(0, values.Length));
}
Typical Usage
Fairly simple; returns a random enum value from an enum type.enum EnemyModels
{
Knight,
FrailOldLady,
Copernicus,
BrianMay,
MalboroGuy
}
void SpawnEnemy()
{
EnemyModels modelType = GetRandomEnum<EnemyModels>();
// Now we have a random enemy model type.
}
Unity Helper Methods #2: BoxCollider.GetPointInCollider
/// <summary>
/// Returns a random world point inside the given BoxCollider
/// </summary>
public static Vector3 GetPointInCollider(this BoxCollider area)
{
    var bounds = area.bounds;
    var center = bounds.center;

    var x = UnityEngine.Random.Range(center.x - bounds.extents.x, center.x + bounds.extents.x);
    var z = UnityEngine.Random.Range(center.z - bounds.extents.z, center.z + bounds.extents.z);

    return new Vector3(x, 0, z);
}
I normally use this method to get a random spawnpoint within my spawn area represented with a BoxCollider (set to a trigger of course).
Notice how I hardcode Y to 0 because the Y position is irrelevant to me since that is set by code outside of this method.
public BoxCollider spawnArea;

void SpawnWhatever()
{
    Vector3 spawnPoint = spawnArea.GetPointInCollider();
    // Spawn something at the random spawnpoint we got
    // ...
}

Unity Helper Methods #1: Animator.SetLayerWeights
/// <summary>
/// Sets the weight of all the layers in the specified Animator
/// </summary>
/// <param name="animator">The animator</param>
/// <param name="totalLayers">The number of layers this animator contains</param>
/// <param name="weight">The value of the weight</param>
public static void SetLayerWeights(this Animator animator, int totalLayers, float weight)
{
    for (int i = 0; i < totalLayers; i++)
    {
        animator.SetLayerWeight(i + 1, weight);
    }
}
Description
Starting with a fairly trivial method; setting the weight of 'all' the layers of an Animator. When a game starts, Unity by default sets all the layers of the Animators' Controllers to 0.Unfortunately, the method needs to be supplied with the number of layers that the Animator contains because I haven't yet found a way how to get the number of layers programmatically.
Typical Usage
I use this method at the start of a game to set the weight of all the layers to 1.So, if I know that I have 4 layers for a particular Animator:
animator.SetLayerWeights(4, 1); // Sets the weight of all (4) the layers of my animator
Tuesday, May 7, 2013
Coloring individual characters in an NGUI UILabel text
For the game project that I'm currently working on, I needed to find an easy way to color individual characters in the text of an NGUI UILabel.
Fortunately, the solution is pretty simple. When the supportEncoding boolean field on a UILabel is set to true, the text supports color encoding in the [RRGGBB] format.
This means that we can have write text such as the following (the [-] is used to revert to a previous color):

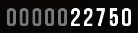
The reason I needed to do this was because we want the leading zeros in the Score UILabel to have a different colour than the actual score. And for that, I wrote this neat little method to format my current score to a string with a predefined number of leading zeros and then color those leading zeros independent from the main colour of the label text.
And the end result pretty much looks like our designer intended:
Fortunately, the solution is pretty simple. When the supportEncoding boolean field on a UILabel is set to true, the text supports color encoding in the [RRGGBB] format.
This means that we can have write text such as the following (the [-] is used to revert to a previous color):
[FF0000]Red[-] [00FF00]Green[-] [0000FF]Blue[-]
The reason I needed to do this was because we want the leading zeros in the Score UILabel to have a different colour than the actual score. And for that, I wrote this neat little method to format my current score to a string with a predefined number of leading zeros and then color those leading zeros independent from the main colour of the label text.
private string FormatScore(int score, string leadingZerosRGBColor, int totalDigits)
{
    var scoreString = score.ToString(CultureInfo.InvariantCulture);
    var zeros = totalDigits - scoreString.Length;
    if (score == 0)
    {
        scoreString = String.Empty;
        zeros++;
    }

    return String.Format("[{0}]{1}[-]{2}", leadingZerosRGBColor, new string('0', zeros <= 0 ? 0 : zeros), scoreString);
}
And the end result pretty much looks like our designer intended:
Subscribe to:
Posts (Atom)


