Connecting the PS2 port to the Strip Board
I soldered the PS2 port in front of a row of 6 female pin headers:
This setup will allow me push in wires into the headers to access the PS2 Port.
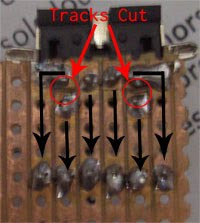
The following is a view from underneath, where the solder joints are:

As you can see, I had to cut two tracks. This is because of the way the setup of the pins of the PS2 port is:

The tracks need to be cut where there are the red lines on the above picture.
Connecting it to the Arduino
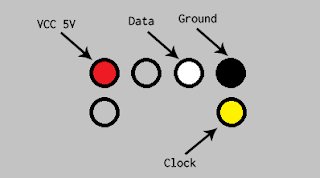
Taking a look at the pins again:

We will be using the above four (colored) pins for our project (the pin on the right of the VCC pin and the one below the VCC pin will not be used).
Next push in wires to the 6 female headers as follows (Black, Yellow, White and Red) :

Next we need to connect the wires to the Arduino as follows:
| Wire | Arduino Pin |
|---|---|
| Red | 5V |
| Black | GND |
| Yellow | Pin 3 (Digital) |
| White | Pin 4 (Digital) |
When we push wires into the female headers and to the Arduino, we will have something like this:

Now all that's left is to plug in the Keyboard to the PS2 Port.
Interfacing with the Arduino
To read the keystrokes with the Arduino, I used the following: PS2KeyboardExt2, which is basically an extension of this library: PS2Keyboard.So first download PS2Keyboard and extract the library to your /hardware/libraries/ folder and then download PS2KeyboardExt2 and overwrite the PS2Keyboard.h and PS2Keyboard.cpp files with the latter version.
The following is the code that you can use to capture the key strokes:
#include <PS2Keyboard.h>

// Simple test program for new PS2Keyboard library
// Connect a PS2 keyboard to pins 3 & 4 (CLK and DATA respectively) and supply 5V to the keyboard
// For examples, see here: http://www.arduino.cc/playground/ComponentLib/Ps2mouse
// or                here: http://www.beyondlogic.org/keyboard/keybrd.htm
// That second article is a great place to start if you want to understand whats going on
//
// When you've compiled the code and uploaded it to the board, start a serial monitor at
// 9600bd.  Then press keys on your PS2 keyboard (the one connected to Arduino, not the one
// connected to your computer!) Try using <shift>, <ctrl> and <alt> keys
// and check that the caps_lock key sets the caps_lock light.
// Pressing <esc> key should reset the keyboard and you should see all 3 lights go on briefly.

#define KBD_CLK_PIN  3
#define KBD_DATA_PIN 4

PS2Keyboard keyboard;

void setup() {
  keyboard.begin(KBD_DATA_PIN);

  Serial.begin(9600);
  delay(1000);
}

#define is_printable(c) (!(c&0x80))   // don't print if top bit is set

void loop() {

  if(keyboard.available()) {

    // reading the "extra" bits is optional
    byte   extra = keyboard.read_extra(); // must read extra before reading the character byte
    byte       c = keyboard.read();

    boolean ctrl = extra & 1;  // <ctrl> is bit 0
    boolean  alt = extra & 2;  //  <alt> is bit 1

    if (ctrl) Serial.print('^');
    if (alt)  Serial.print('_');

    if      (c==PS2_KC_UP)      Serial.print("up\n");
    else if (c==PS2_KC_DOWN)    Serial.print("down\n");
    else if (c==PS2_KC_BKSP)    Serial.print("backspace\n");
    else if (c==PS2_KC_ESC)   { Serial.print("escape and reset\n"); keyboard.reset(); }
    else if ( is_printable(c) ) Serial.print(c);   // don't print any untrapped special characters
  }
}
Notice that directives KBD_CLK_PIN (clock pin) and KBD_DATA_PIN (data pin) are set to 3 and 4 respectively, and this corresponds to the way we hooked the PS2 port to the Arduino before.
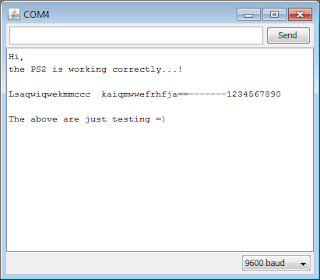
Now after you compile and upload, open up the Serial Monitor and start typing. You should get something like the following:

