Thursday, January 28, 2010

Connecting a PS2 Keyboard to an Arduino

In this post, I will talk about how I connected and interfaced with a PS2 Keyboard using an Arduino. First we'll start with the basics; Soldering the PS2 port onto a strip board.

Connecting the PS2 port to the Strip Board

I soldered the PS2 port in front of a row of 6 female pin headers:


This setup will allow me push in wires into the headers to access the PS2 Port.

The following is a view from underneath, where the solder joints are:


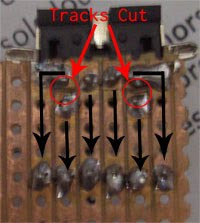
As you can see, I had to cut two tracks. This is because of the way the setup of the pins of the PS2 port is:


The tracks need to be cut where there are the red lines on the above picture.

Connecting it to the Arduino


Taking a look at the pins again:


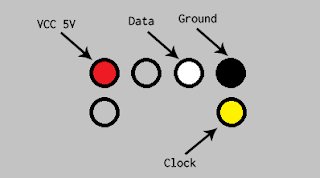
We will be using the above four (colored) pins for our project (the pin on the right of the VCC pin and the one below the VCC pin will not be used).

Next push in wires to the 6 female headers as follows (Black, Yellow, White and Red) :


Next we need to connect the wires to the Arduino as follows:

Wire
Arduino Pin
Red
5V
Black
GND
Yellow
Pin 3 (Digital)
White
Pin 4 (Digital)

When we push wires into the female headers and to the Arduino, we will have something like this:


Now all that's left is to plug in the Keyboard to the PS2 Port.

Interfacing with the Arduino

To read the keystrokes with the Arduino, I used the following: PS2KeyboardExt2, which is basically an extension of this library: PS2Keyboard.

So first download PS2Keyboard and extract the library to your /hardware/libraries/ folder and then download PS2KeyboardExt2 and overwrite the PS2Keyboard.h and PS2Keyboard.cpp files with the latter version.

The following is the code that you can use to capture the key strokes:

#include <PS2Keyboard.h>

// Simple test program for new PS2Keyboard library
// Connect a PS2 keyboard to pins 3 & 4 (CLK and DATA respectively) and supply 5V to the keyboard
// For examples, see here: http://www.arduino.cc/playground/ComponentLib/Ps2mouse
// or                here: http://www.beyondlogic.org/keyboard/keybrd.htm
// That second article is a great place to start if you want to understand whats going on
//
// When you've compiled the code and uploaded it to the board, start a serial monitor at
// 9600bd.  Then press keys on your PS2 keyboard (the one connected to Arduino, not the one
// connected to your computer!) Try using <shift>, <ctrl> and <alt> keys
// and check that the caps_lock key sets the caps_lock light.
// Pressing <esc> key should reset the keyboard and you should see all 3 lights go on briefly.

#define KBD_CLK_PIN  3
#define KBD_DATA_PIN 4

PS2Keyboard keyboard;

void setup() {
  keyboard.begin(KBD_DATA_PIN);

  Serial.begin(9600);
  delay(1000);
}

#define is_printable(c) (!(c&0x80))   // don't print if top bit is set

void loop() {

  if(keyboard.available()) {

    // reading the "extra" bits is optional
    byte   extra = keyboard.read_extra(); // must read extra before reading the character byte
    byte       c = keyboard.read();

    boolean ctrl = extra & 1;  // <ctrl> is bit 0
    boolean  alt = extra & 2;  //  <alt> is bit 1

    if (ctrl) Serial.print('^');
    if (alt)  Serial.print('_');

    if      (c==PS2_KC_UP)      Serial.print("up\n");
    else if (c==PS2_KC_DOWN)    Serial.print("down\n");
    else if (c==PS2_KC_BKSP)    Serial.print("backspace\n");
    else if (c==PS2_KC_ESC)   { Serial.print("escape and reset\n"); keyboard.reset(); }
    else if ( is_printable(c) ) Serial.print(c);   // don't print any untrapped special characters
  } 
}

Notice that directives KBD_CLK_PIN (clock pin) and KBD_DATA_PIN (data pin) are set to 3 and 4 respectively, and this corresponds to the way we hooked the PS2 port to the Arduino before.

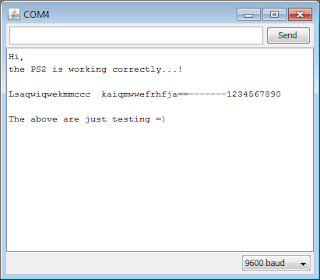
Now after you compile and upload, open up the Serial Monitor and start typing. You should get something like the following:


Sunday, January 24, 2010

Unit Testing for Exceptions with Visual Studio 2008

The following are the two different ways I've unit tested for Exceptions with Visual Studio 2008.

Using Try / Catch

There first way of testing for Exceptions is by using the try-catch construct:

[TestMethod]
public void TestCard()
{
 var c = new CreditCard();
 try
 {
  c.CardNo = "123"; //Should throw an exception
  Assert.Fail("InvalidCardNoException wasn't thrown");
 }
 catch (InvalidCardNoException)
 {
  Assert.IsTrue(true, "InvalidCardNoException was properly thrown");
 }
}

As you can see from the above example, if the exception isn't thrown, Assert.Fail is called which fails the test; and if it is thrown, we succeed the test with Assert.IsTrue.

But Visual Studio 2008 offers a better way on how to deal with exceptions, by using the ExpectedException Attribute.

Using the ExpectedExceptionAttribute Class

Here is the same example, but this time using the ExpectedException Attribute:

[TestMethod, ExpectedException(typeof(InvalidCardNoException))]
public void TestCard()
{
 var c = new CreditCard();
 c.CardNo = "123"; //Should throw an exception
}


Friday, January 22, 2010

Wrapping column text in a table in LaTeX

Let's say you have the following table in LaTeX:

\begin{tabular}{|l|l|}
  \hline
  This is a very very long cell name.  Very long indeed 
  & This is a very, very, very long line that keeps on going even outside of the page!!!!! \\
  \hline
\end{tabular}

The output generated from the above tabular environment is as follows:


As you can see from the above output, the text does not wrap but just keeps going off out of the page.

Introducing the TabularX package


To fix this problem, we will use the tabularx package and use the tabularx environment:

\usepackage{tabularx}

\begin{tabularx}{\linewidth}{|X|X|}
  \hline
  This is a very very long cell name.  Very long indeed 
  & This is a very, very, very long line that keeps on going even outside of the page!!!!! \\
  \hline
\end{tabularx}

The generic template of the tabularx environment is as follows:

\begin{tabularx}{w}{\X\X . . .\}

where:
  • w : the desired width of the table
  • X : marks each column for which the width is to be adjusted

This is now the output with the tabularx environment:


Saturday, January 16, 2010

Indenting an item in an enumerate environment in LaTeX

To indent an item in a list in LaTeX, we will use the following two commands:

\setlength\itemindent{size}

And we will use it like such:

\begin{enumerate}
\item This item is not indented
{\setlength\itemindent{25pt} \item This item is indented}
\item This item is not indented
{\setlength\itemindent{25pt} \item This item is indented}
\item This item is not indented
\end{enumerate}

This will generate the following:


We can improve the above code by making use of the \newcommand to encapsulate \setlength and \itemindent into a single command :

\newcommand{\indentitem}{\setlength\itemindent{25pt}}

\begin{enumerate}
\item This item is not indented
{\indentitem \item This item is indented}
\item This item is not indented
{\indentitem \item This item is indented}
\item This item is not indented
\end{enumerate}


Saturday, January 9, 2010

Starting a new page with every section in LaTeX

A \section in LaTeX doesn't insert a page break and start a new page automatically.

To insert a section in a new page, you would normally do the following:

\newpage
\section{new section}

But there is a better way to do this if you want every \section to start on a new page:

\let\stdsection\section
\renewcommand\section{\newpage\stdsection}

The above redefines the \section command to include the \newpage when using the \section.


Saturday, January 2, 2010

The reason why Firebug's console.trace sometimes reports anonymous()

From Firebug's Console API:

Console.trace prints an interactive stack trace of JavaScript execution at the point where it is called.

Let's take the following code:

var f1 = function (a) {
    return f2(a + 1);
};
var f2 = function (a) {
    return f3(a + 1);
}
var f3 = function (a) {
    console.trace();
};

f1(5);

The console.trace in f3 prints out the following output in Firebug's Console:


As you can see from the above output, Firebug is reporting anonymous() for all the functions.

Why?

The reason for this is because I am using anonymous functions and for the JavaScript interpreter (and Firebug) f1, f2 and f3 are just variable names.

Now, let's change the above code to use named functions instead of anonymous functions:

function f1(a) {
    return f2(a + 1);
}

function f2(a) {
    return f3(a + 1);
}

function f3(a) {
    console.trace();
};

f1(5);

This is the output now: